PICO 4 Ultra Enterprise Setup Guide
Preparation
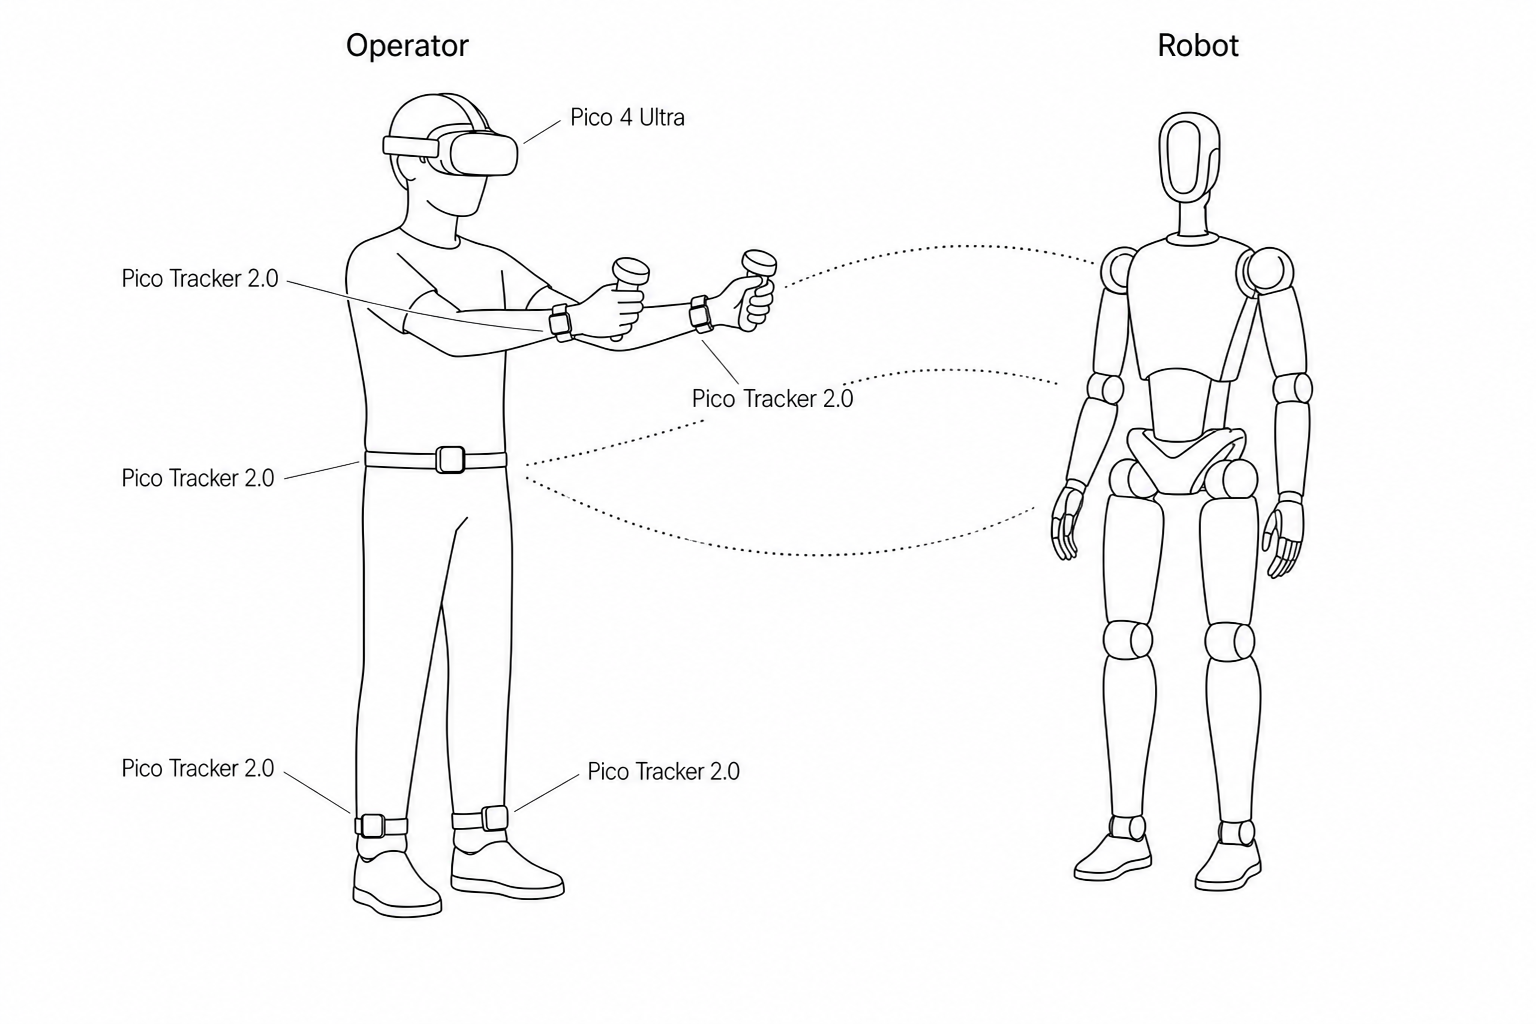
Teleoperation device side
| Device | Quantity | Description | Notes |
|---|---|---|---|
| PND robot | 1 | Adam series robot | Configure teleoperation program |
| User Computer | 1 | Windows recommended | Install Foxglove Studio |
| PICO 4 Ultra Enterprise | 1 | VR headset + left/right controllers | Install PNDbotics_1.0.8.apk See the PICO 4 Ultra Enterprise user guide to wear the device correctly |
| PICO Tracker 2.0 | 5 | Wear on both wrists, both ankles, and waist | See the Tracker tutorial video to wear the device correctly |
First-time setup
- Press and hold the power button on the right side of the headset for 3 seconds to power on.
- On first boot, follow the on-screen prompts to set language and safety boundaries.
- In Settings, connect to the same Wi‑Fi network as the robot.
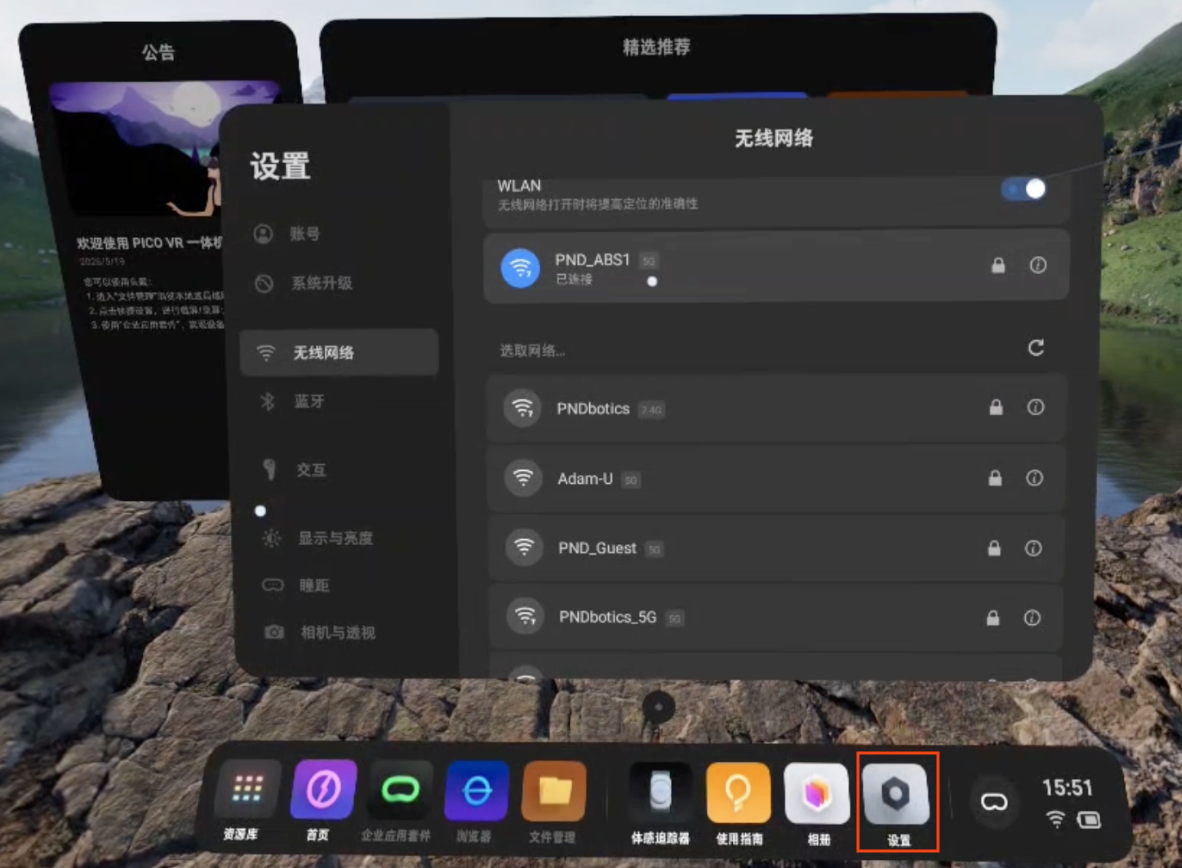
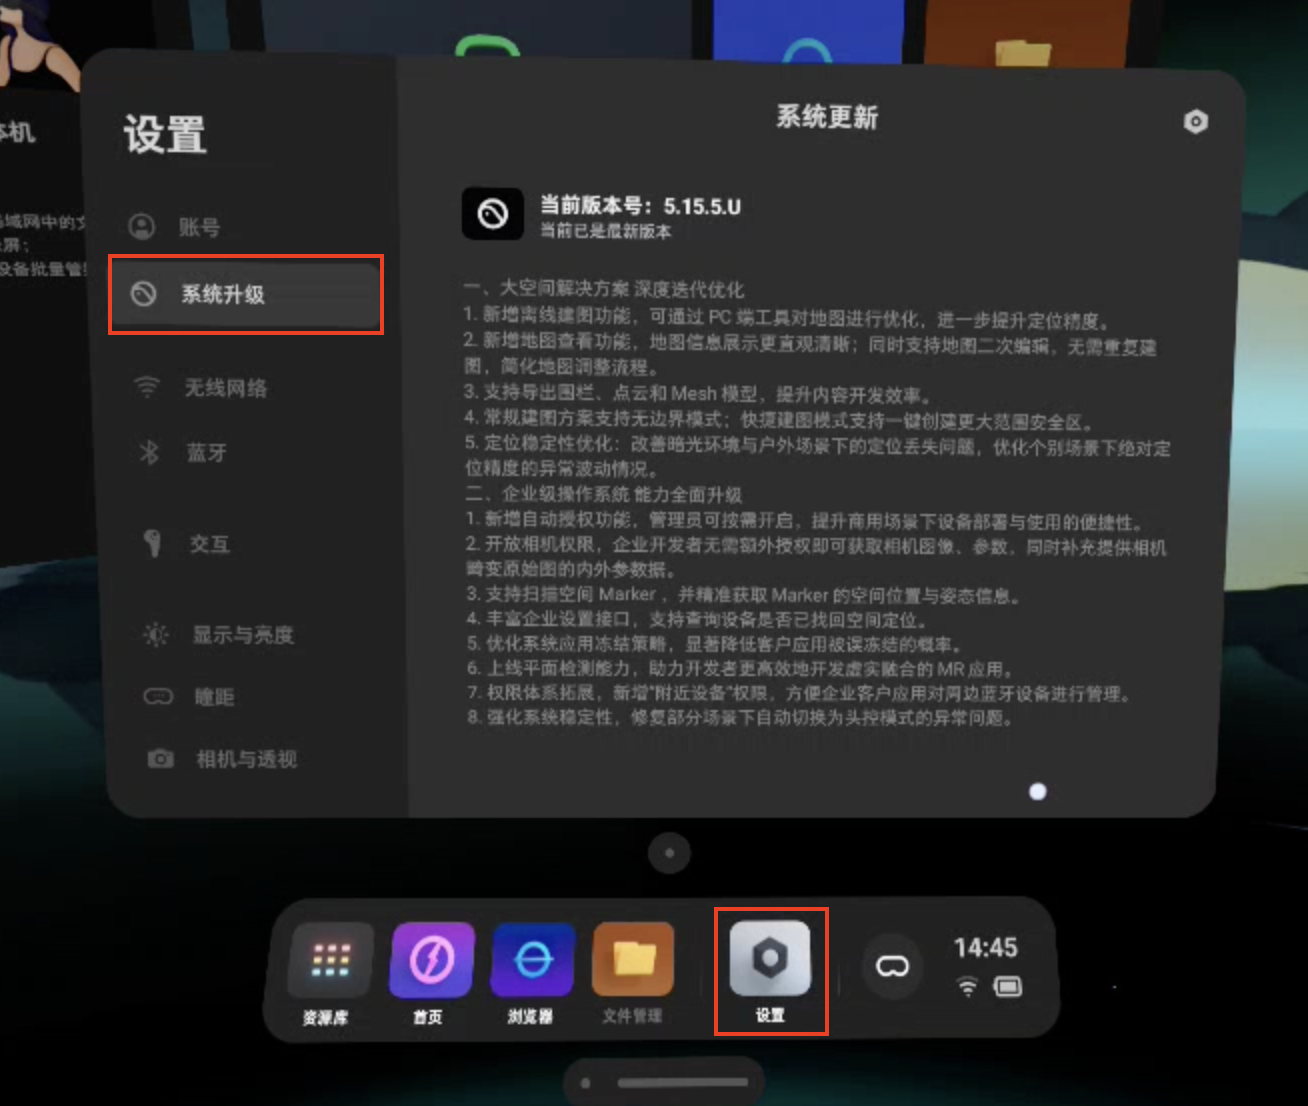
- System version must be ≥ 5.15.5.U. Go to Settings and run System update.
Tip
Safety boundary: Under Settings → Boundary, choose Stationary boundary (recommended for standing operation).
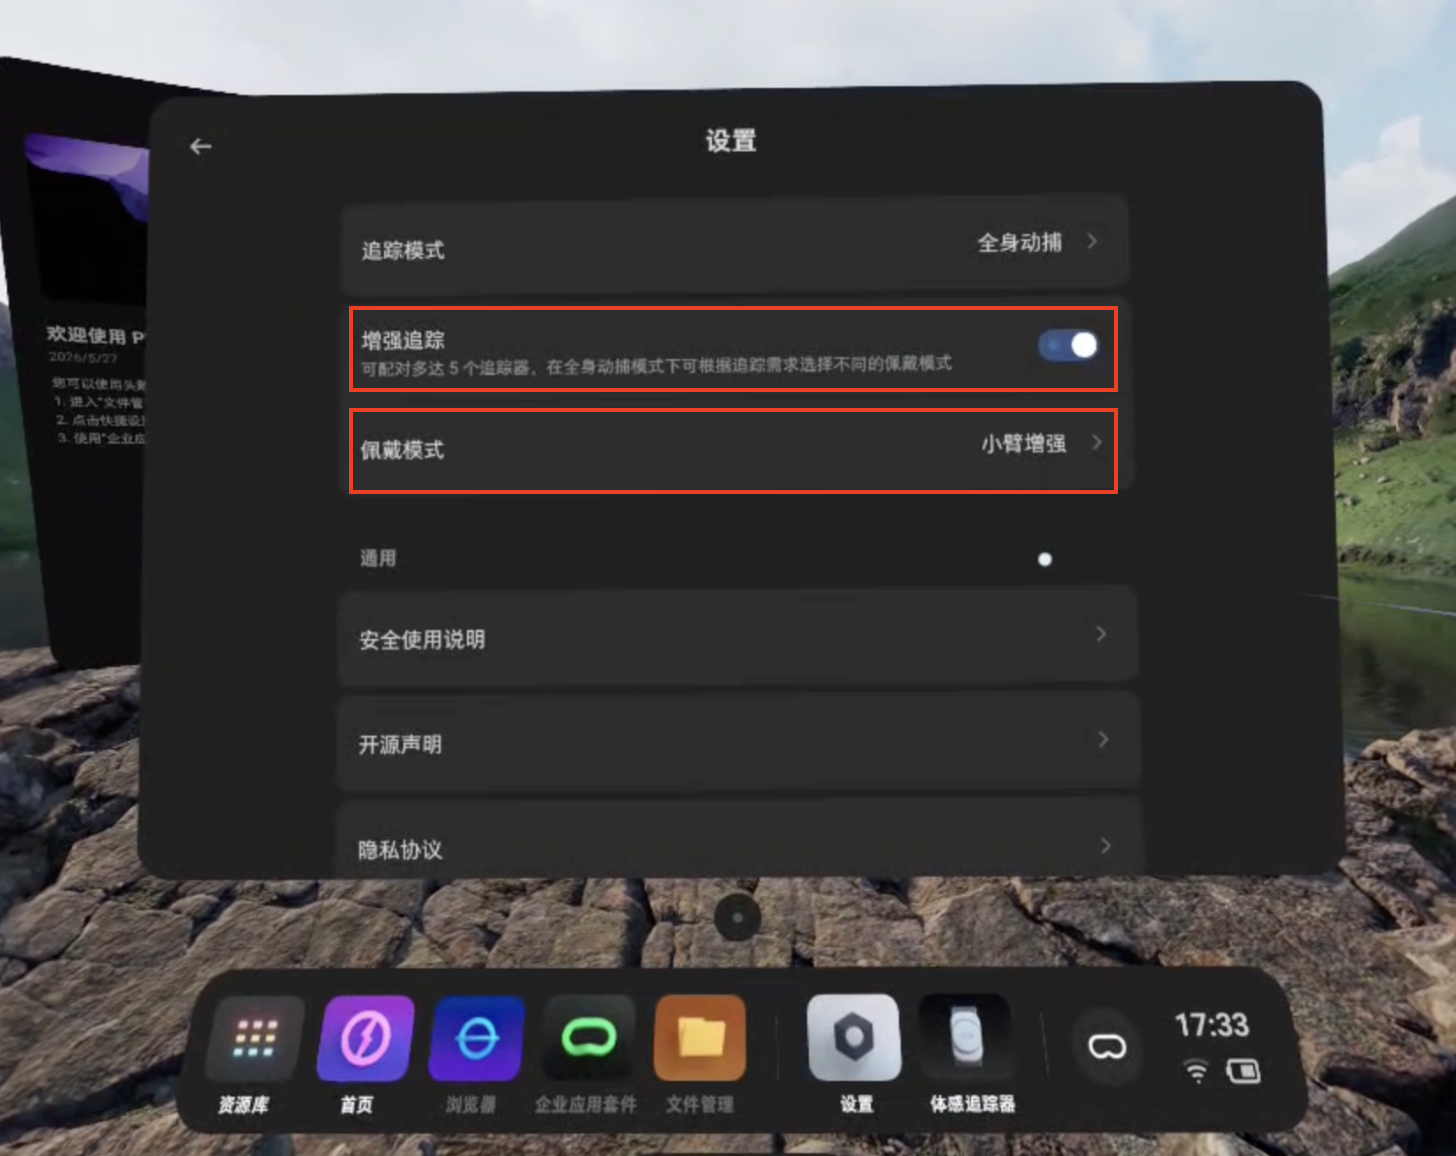
Tracker pairing
- Open the Motion Tracker app on the headset.
- Tap Settings.
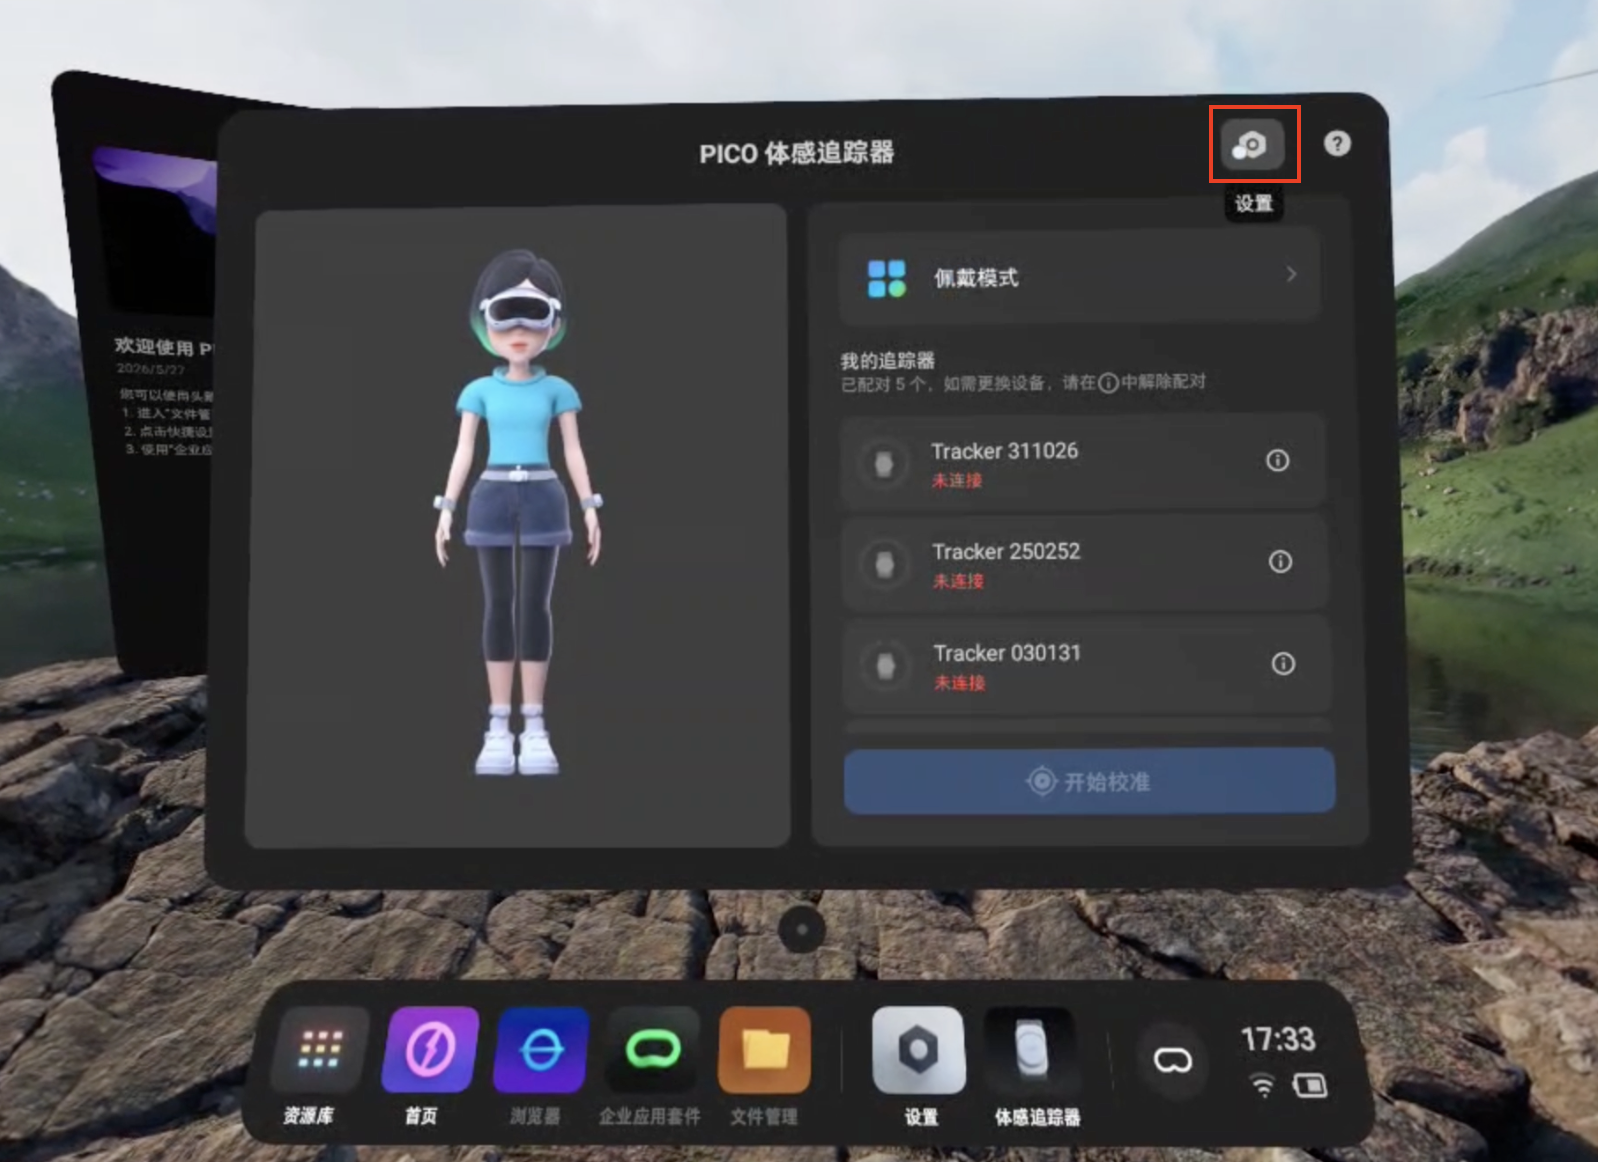
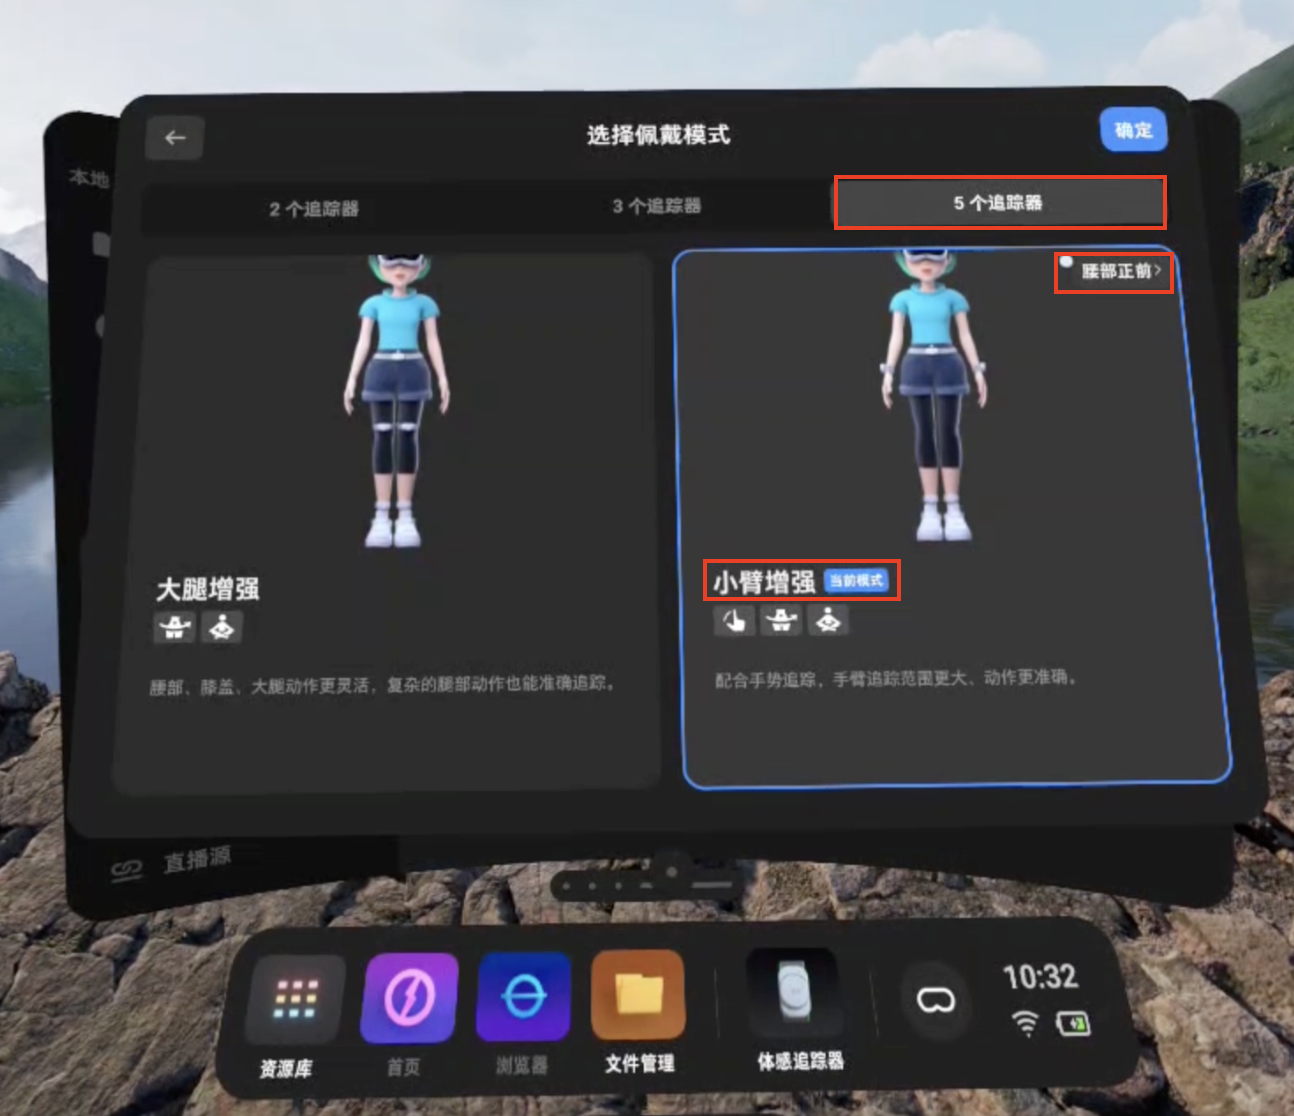
- Enable Enhanced tracking, then tap Wearing mode → 5 trackers → Forearm enhancement → Waist front.
- Press and hold the power button on the Tracker for 3 seconds. The LED will blink blue slowly.
- In the app, tap Connect Tracker and hold the Tracker near the headset to pair. When paired, the LED stays solid blue.
- Repeat the steps above for all 5 Trackers.
Tip: After the first successful pairing, Trackers reconnect automatically when powered on.
Tracker LED status
| LED state | Meaning |
|---|---|
| Solid blue | Connected, working normally |
| Slow blue blink | Powered on, not connected |
| Fast blue blink | Pairing in progress |
| Red | Low battery, charge required |
| Green | Charging complete |
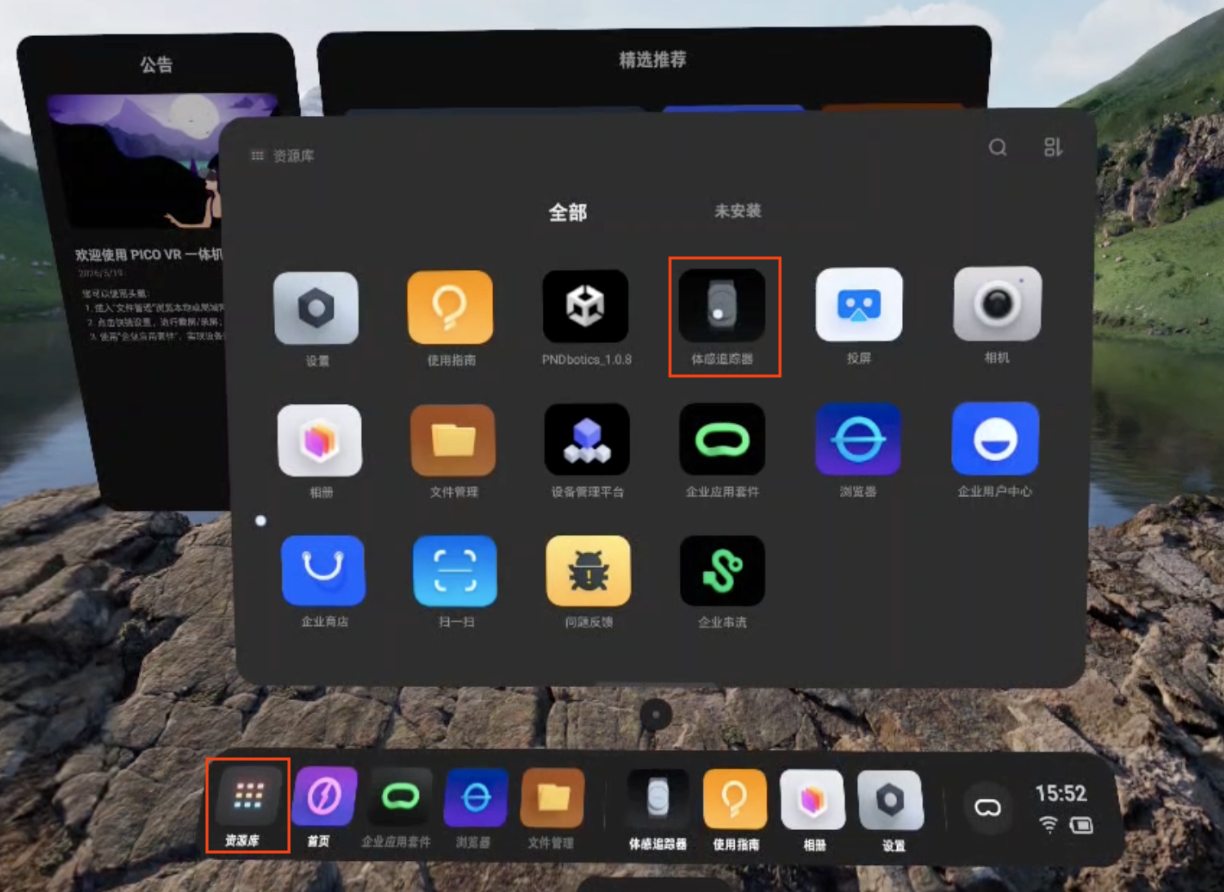
Install PNDbotics app
Tip
If the download is blocked, click Continue anyway to bypass the security warning, or clear your browser cache and try again.
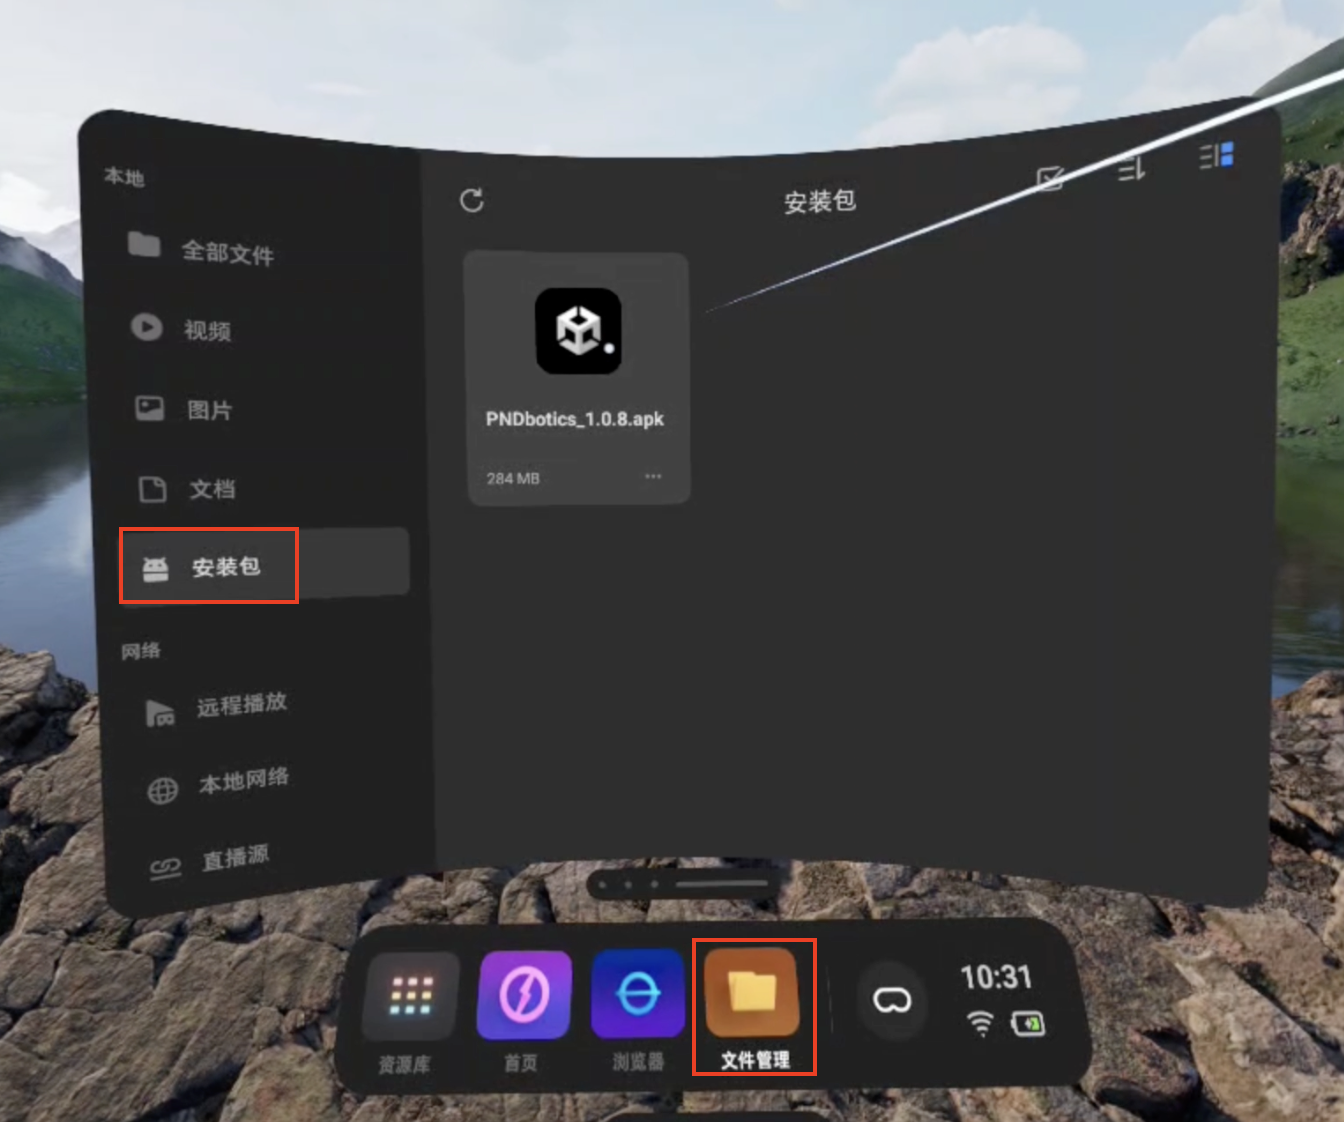
- Connect the PICO to your PC (Windows) via USB cable. Download PNDbotics_1.0.8.apk and copy it to
This PC\PICO 4 Ultra Enterprise\Internal shared storage\Download.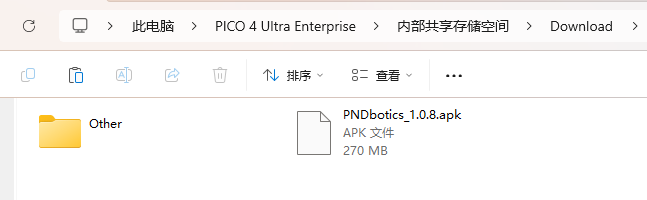
- On the headset, open File Manager → APK → PNDbotics_1.0.8.apk.
Robot side
Follow the standard boot process to start the robot. Ensure your PC and the robot are on the same network segment. See network connection.
-
On your PC, open a terminal and connect to the robot.
-
Install the teleoperation program (requires internet; skip if already installed).
Operation
Run the teleoperation program
ssh pnd-humanoid@192.168.XX.XX # Replace XX.XX with the actual IP (on the back of the remote control handle); default password: pndxyz
source /opt/pnd/pnd_teleop/setup_cli.bash
# Same command for all models:
spteleop teleop adam_u pico mink
PICO headset setup
- Wear all devices per the PICO 4 Ultra Enterprise user guide and Tracker tutorial.
- Power on the PICO headset and all 5 Trackers.
- In Settings, connect to the same Wi‑Fi network as the robot.
-
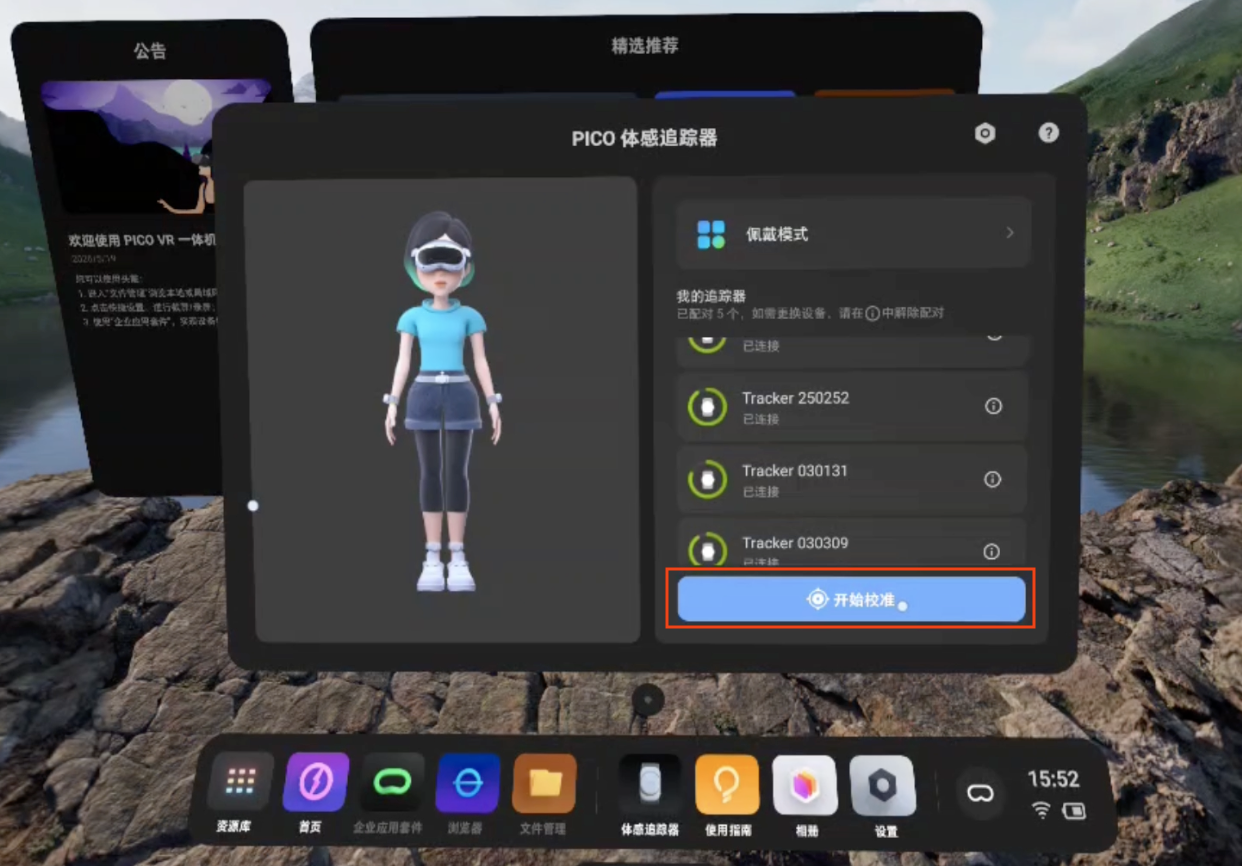
Open the PICO Motion Tracker app on the headset, tap Start Calibration, and follow the on-screen prompts.
Note: Recalibrate before each use.
-
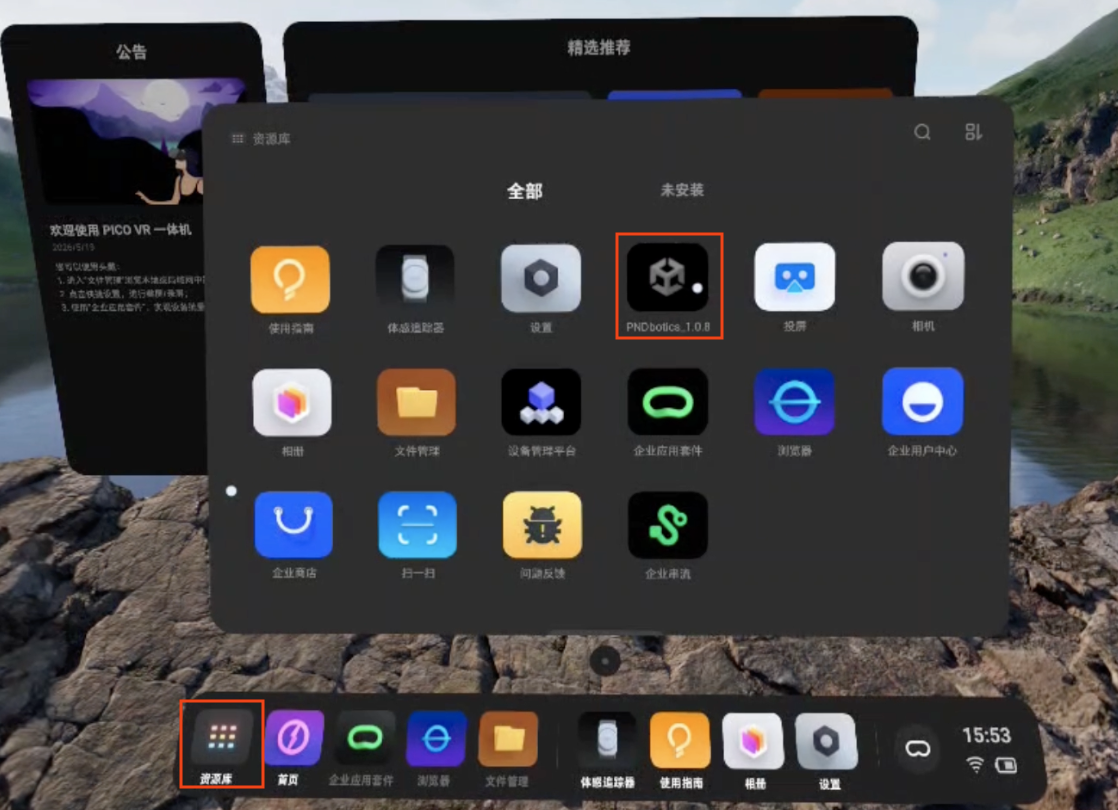
Open the PNDbotics app and tap Setting.
- Tap Whole Body Tracking, enter the robot IP
192.168.XX.XXand port12070, then tap Connect to start streaming. (IP and port are saved for next time.)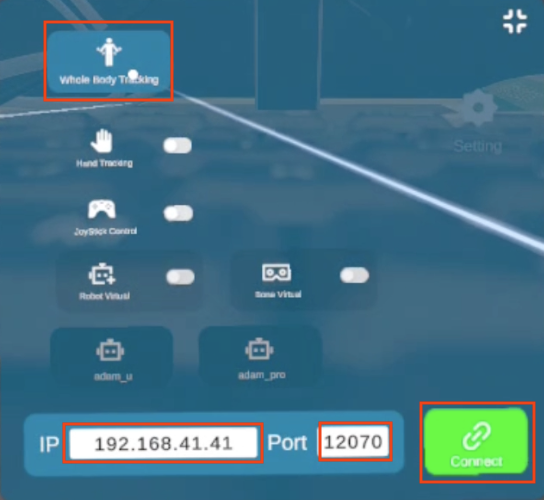
- Check the preview: the virtual skeleton should follow your motion smoothly.
When finished, tap Disconnect to stop sending data to the robot.
Visualization preview
- Install and launch Foxglove Studio on your PC.
- Sign in and click Open Connection.

- Connect via WebSocket:
ws://localhost:8765(replacelocalhostwith the robot IP).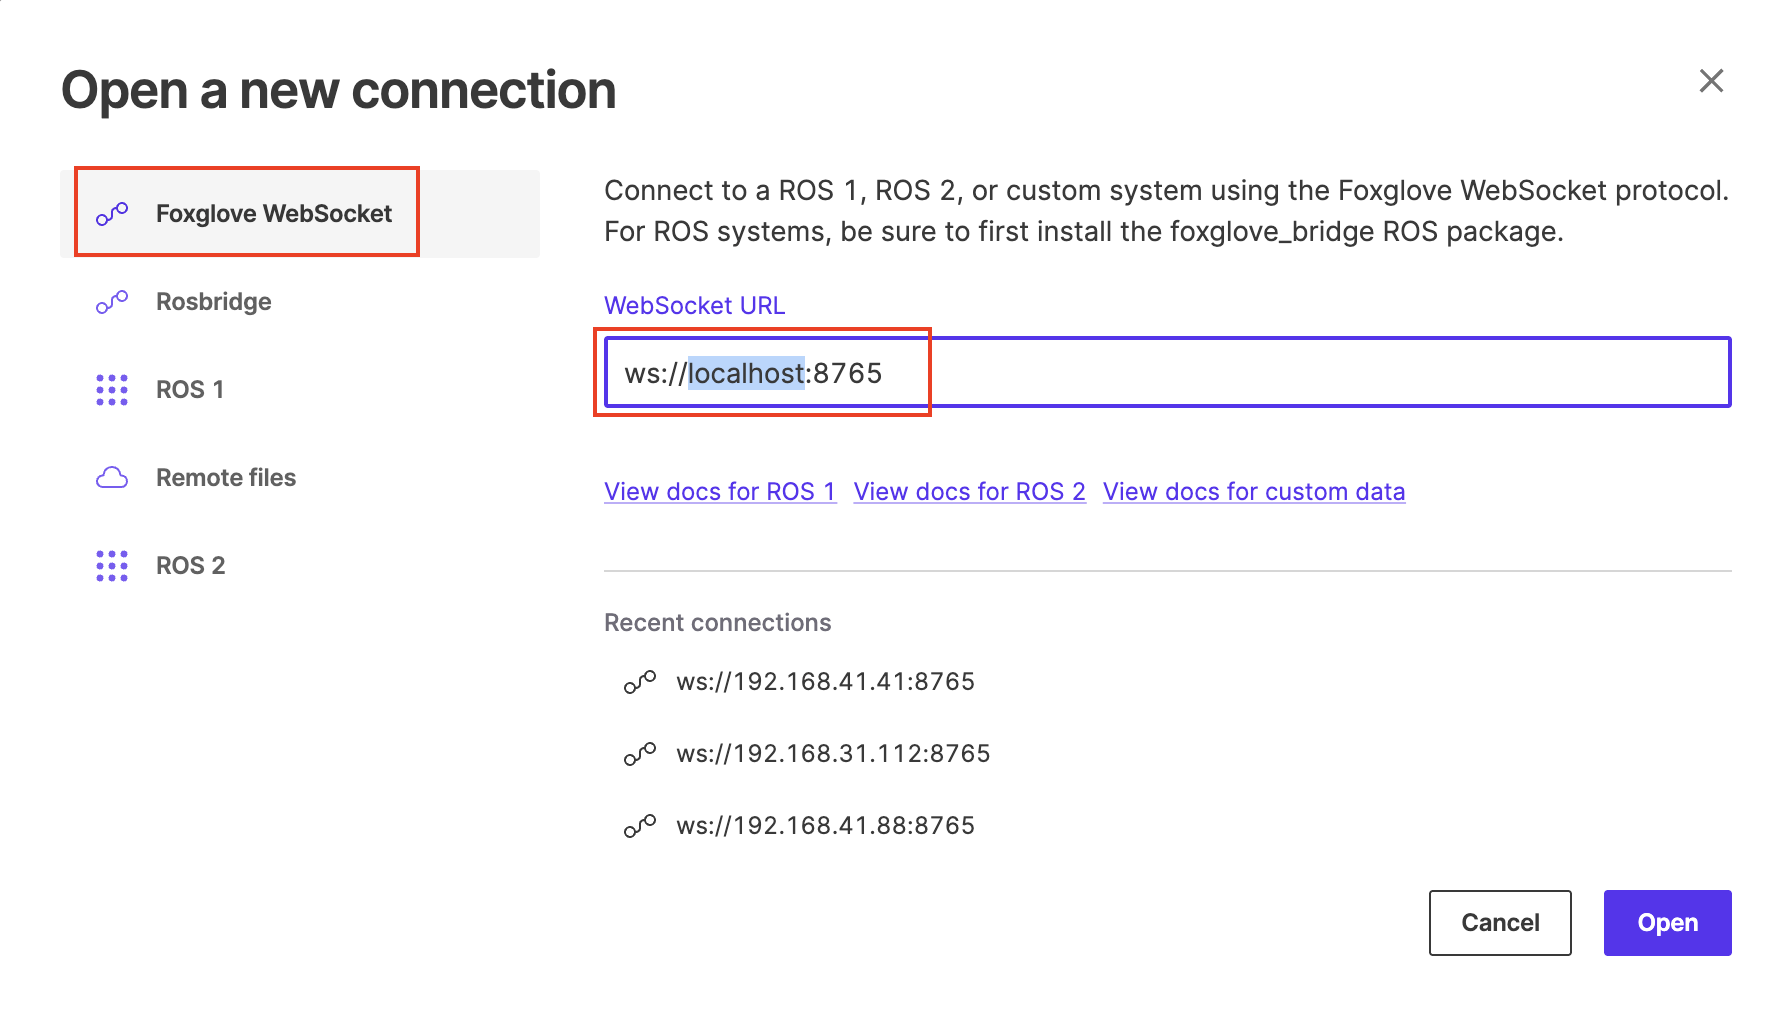
- Open the 3D panel settings.
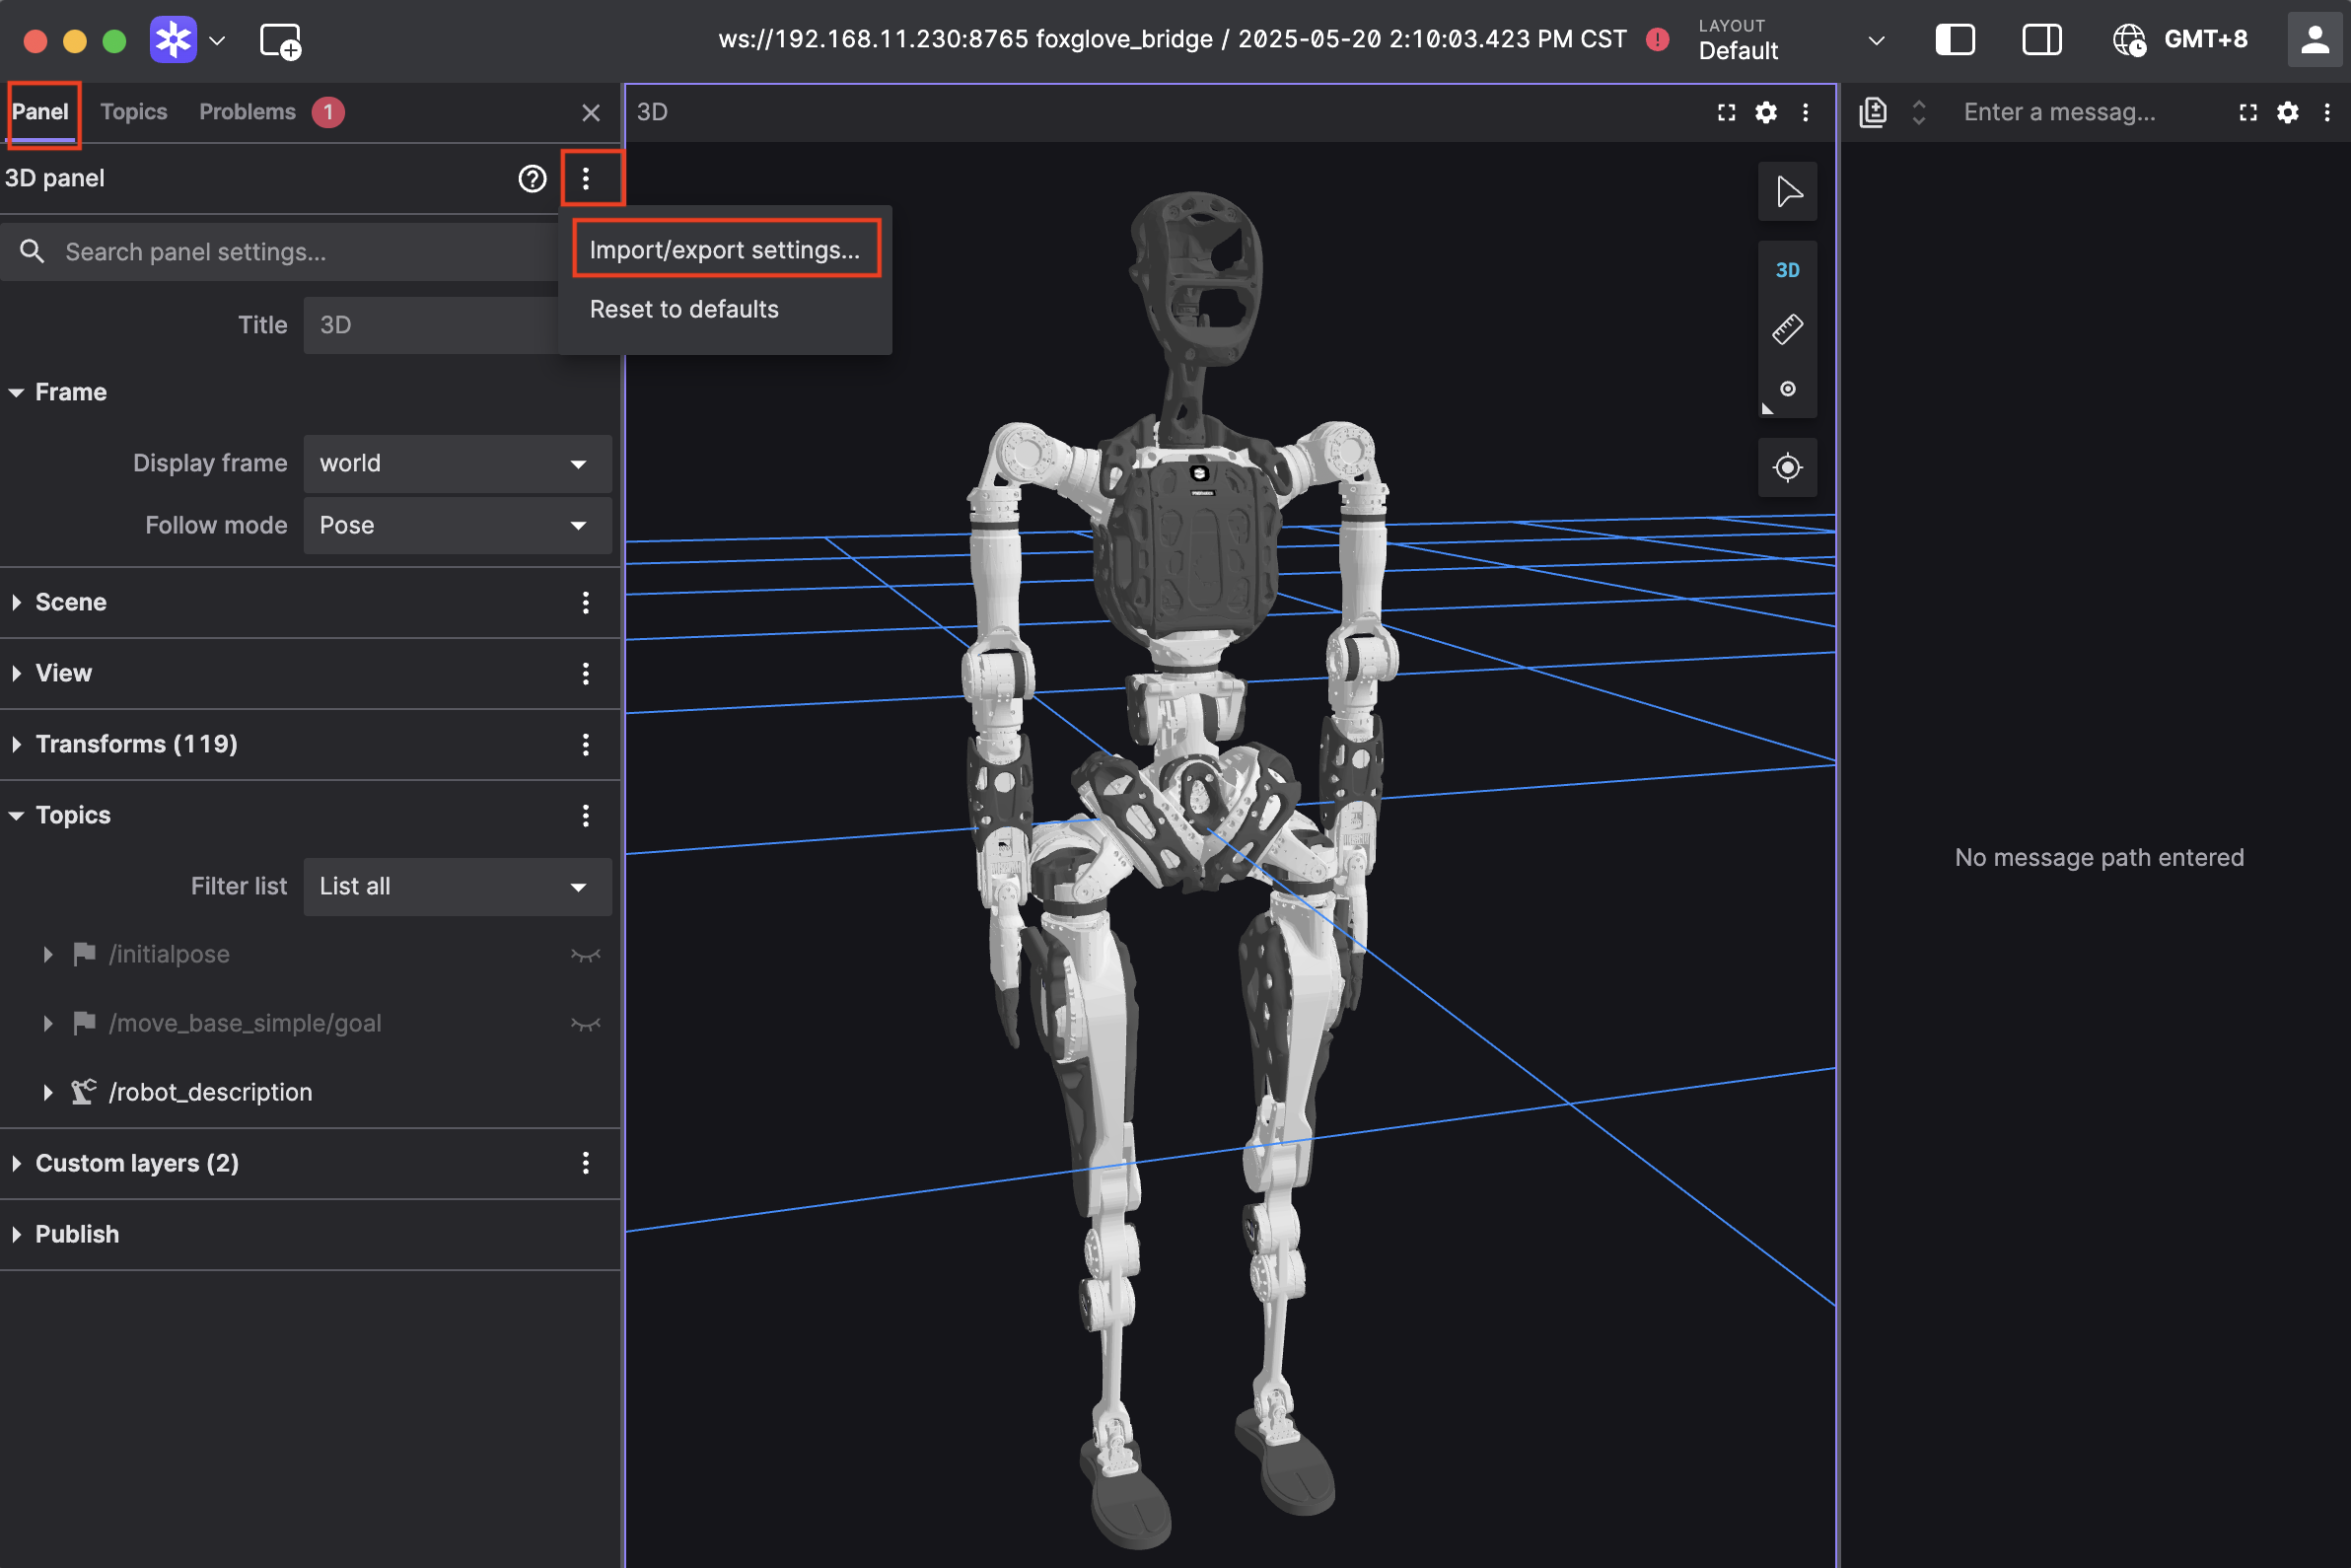
- Paste the configuration below and click Apply to preview motion mapping in real time.
Click to expand configuration code
{
  "layers": {
    "845139cb-26bc-40b3-8161-8ab60af4baf5": {
      "visible": true,
      "frameLocked": true,
      "label": "Grid",
      "instanceId": "845139cb-26bc-40b3-8161-8ab60af4baf5",
      "layerId": "foxglove.Grid",
      "size": 10,
      "divisions": 10,
      "lineWidth": 1,
      "color": "#248eff",
      "position": [
        0,
        0,
        0
      ],
      "rotation": [
        0,
        0,
        0
      ],
      "order": 1
    }
  },
  "cameraState": {
    "perspective": true,
    "distance": 8.362406704377788,
    "phi": 74.10829292531537,
    "thetaOffset": 13.624928863620116,
    "targetOffset": [
      1.3462285617160472,
      3.872395794634993,
      -4.022926534191149e-17
    ],
    "target": [
      0,
      0,
      0
    ],
    "targetOrientation": [
      0,
      0,
      0,
      1
    ],
    "fovy": 45,
    "near": 0.5,
    "far": 5000
  },
  "followMode": "follow-pose",
  "followTf": "world",
  "scene": {
    "meshUpAxis": "z_up",
    "transforms": {
      "showLabel": false,
      "enablePreloading": true,
      "axisSize": 0
    },
    "ignoreColladaUpAxis": true
  },
  "transforms": {},
  "topics": {
    "/robot_description": {
      "visible": true
    }
  },
  "publish": {
    "type": "point",
    "poseTopic": "/move_base_simple/goal",
    "pointTopic": "/clicked_point",
    "poseEstimateTopic": "/initialpose",
    "poseEstimateXDeviation": 0.5,
    "poseEstimateYDeviation": 0.5,
    "poseEstimateThetaDeviation": 0.26179939
  },
  "imageMode": {}
}
Calibration
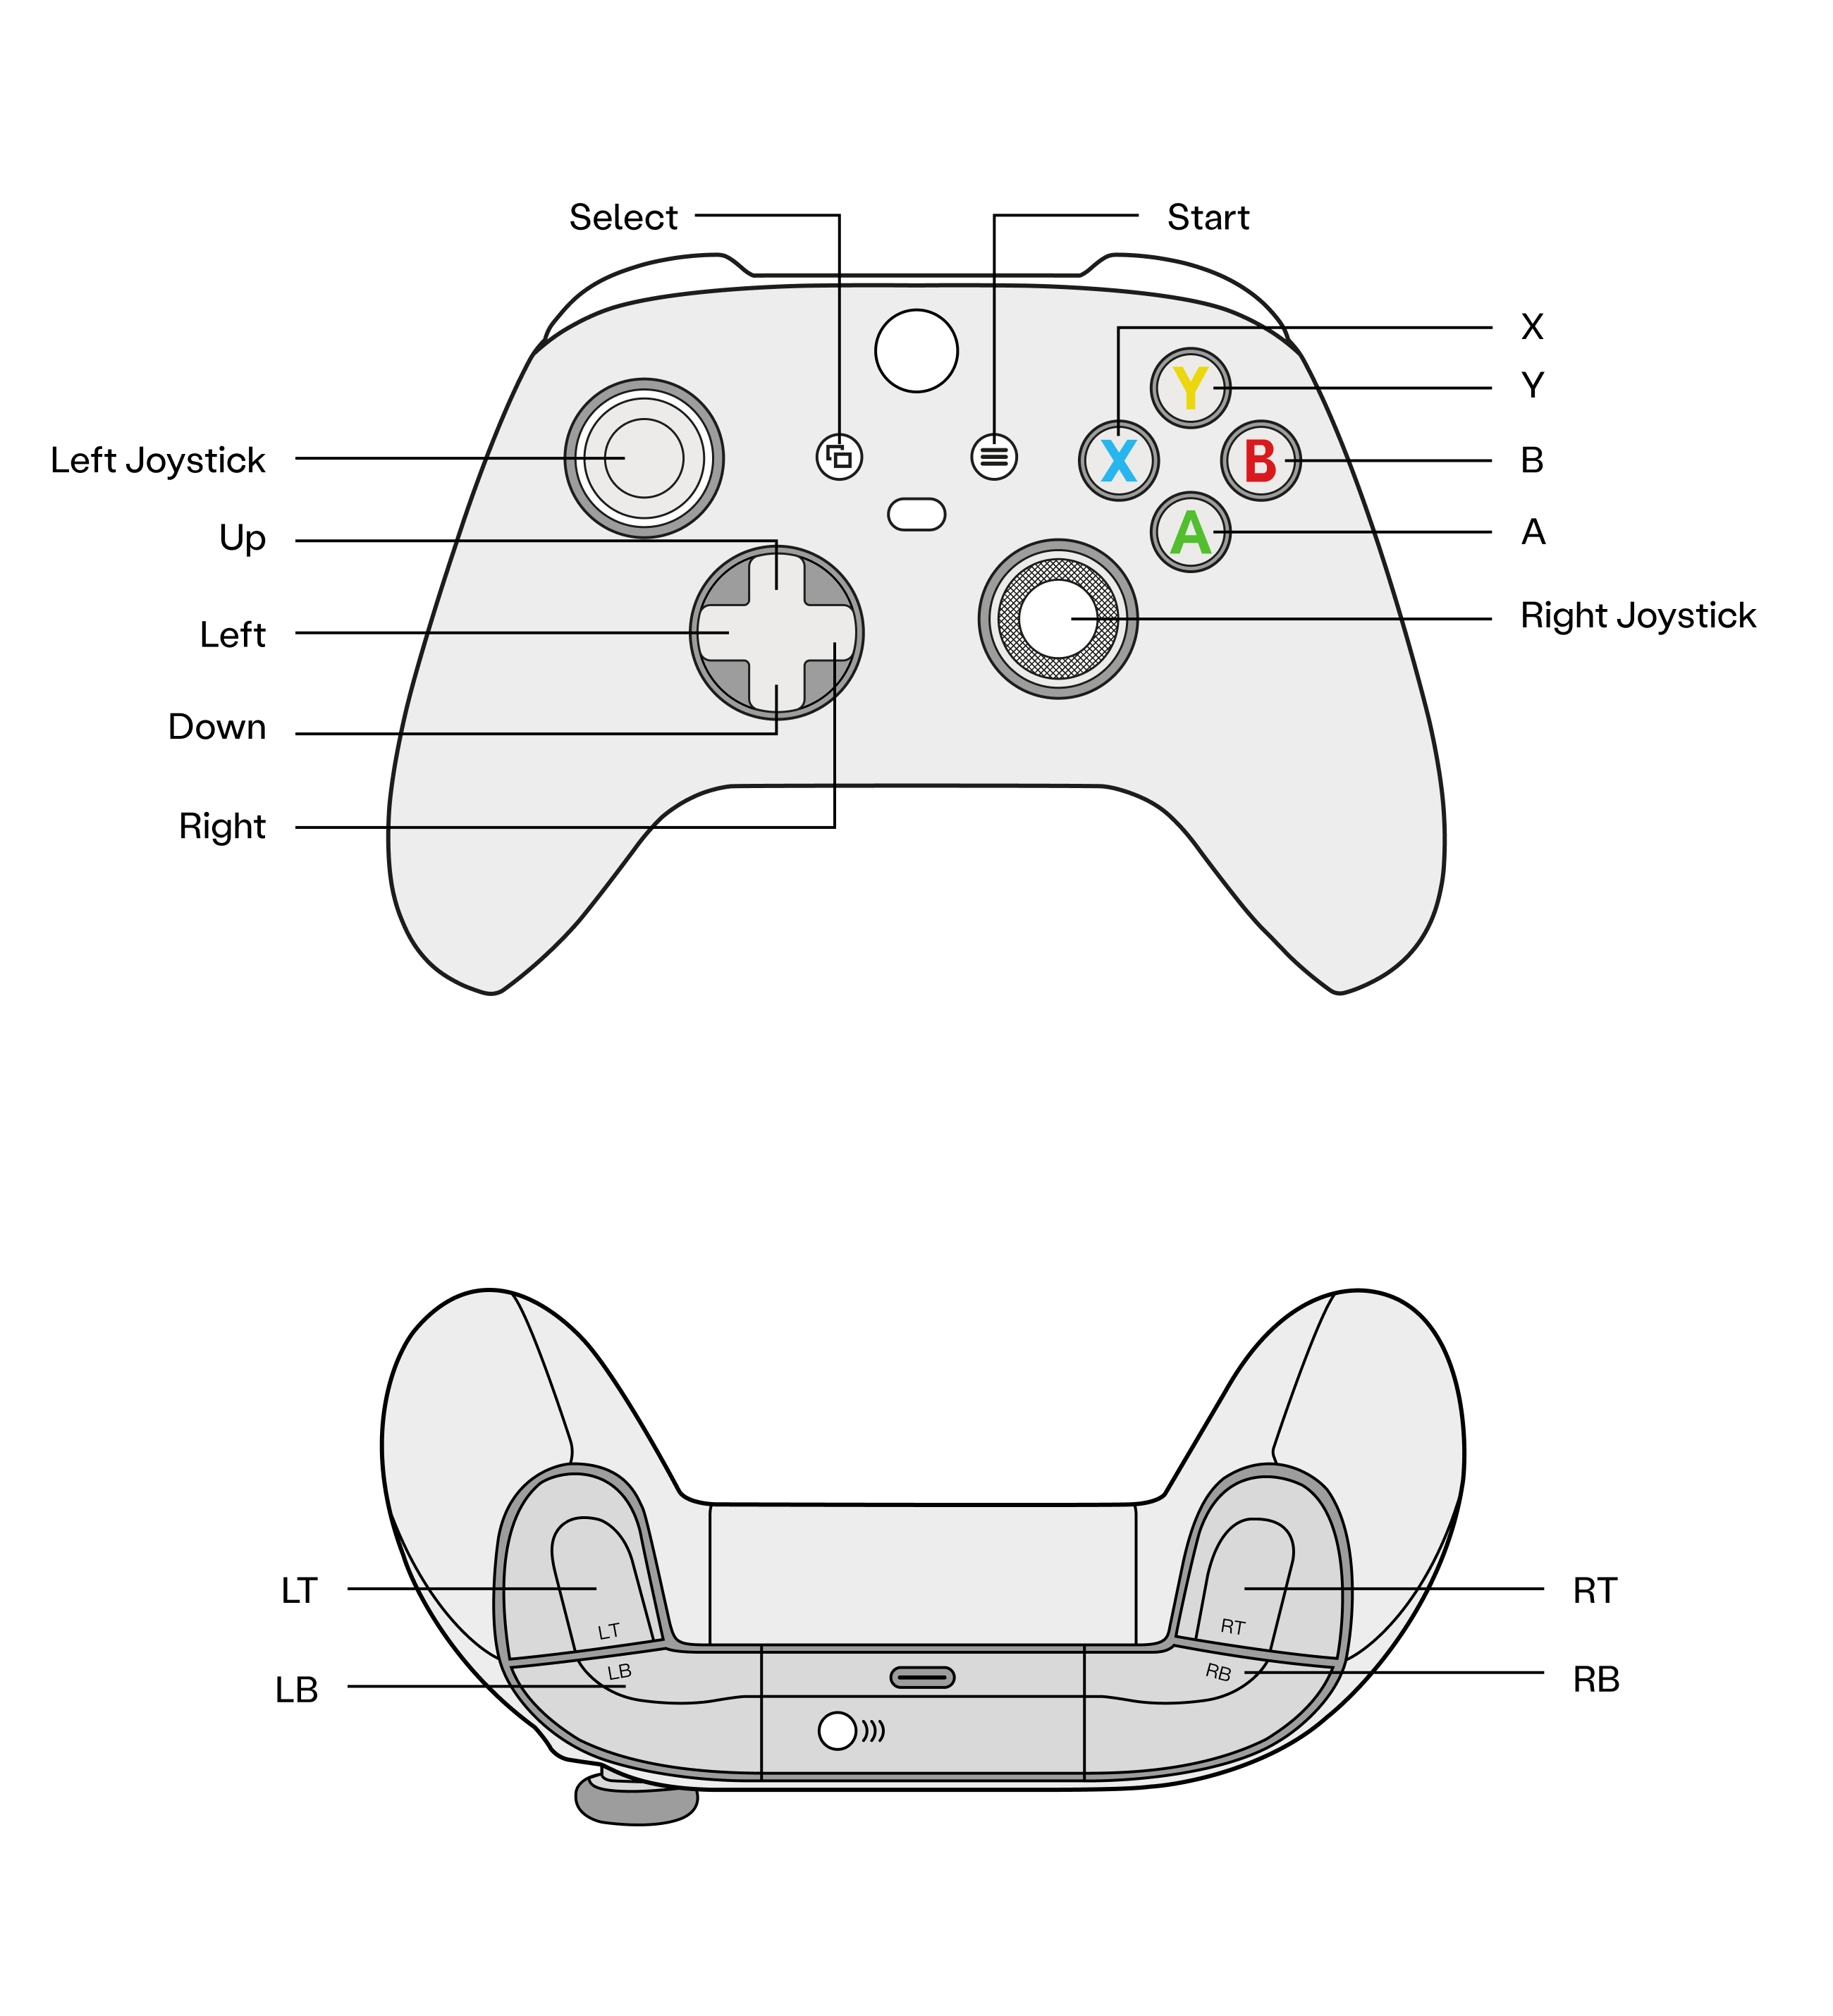
- Hold the right controller Home button for about 3 seconds to reset position.
- Keep the calibration pose (standing or seated, choose one): arms parallel to the ground, controllers held with palms facing inward, then press A on the right controller.
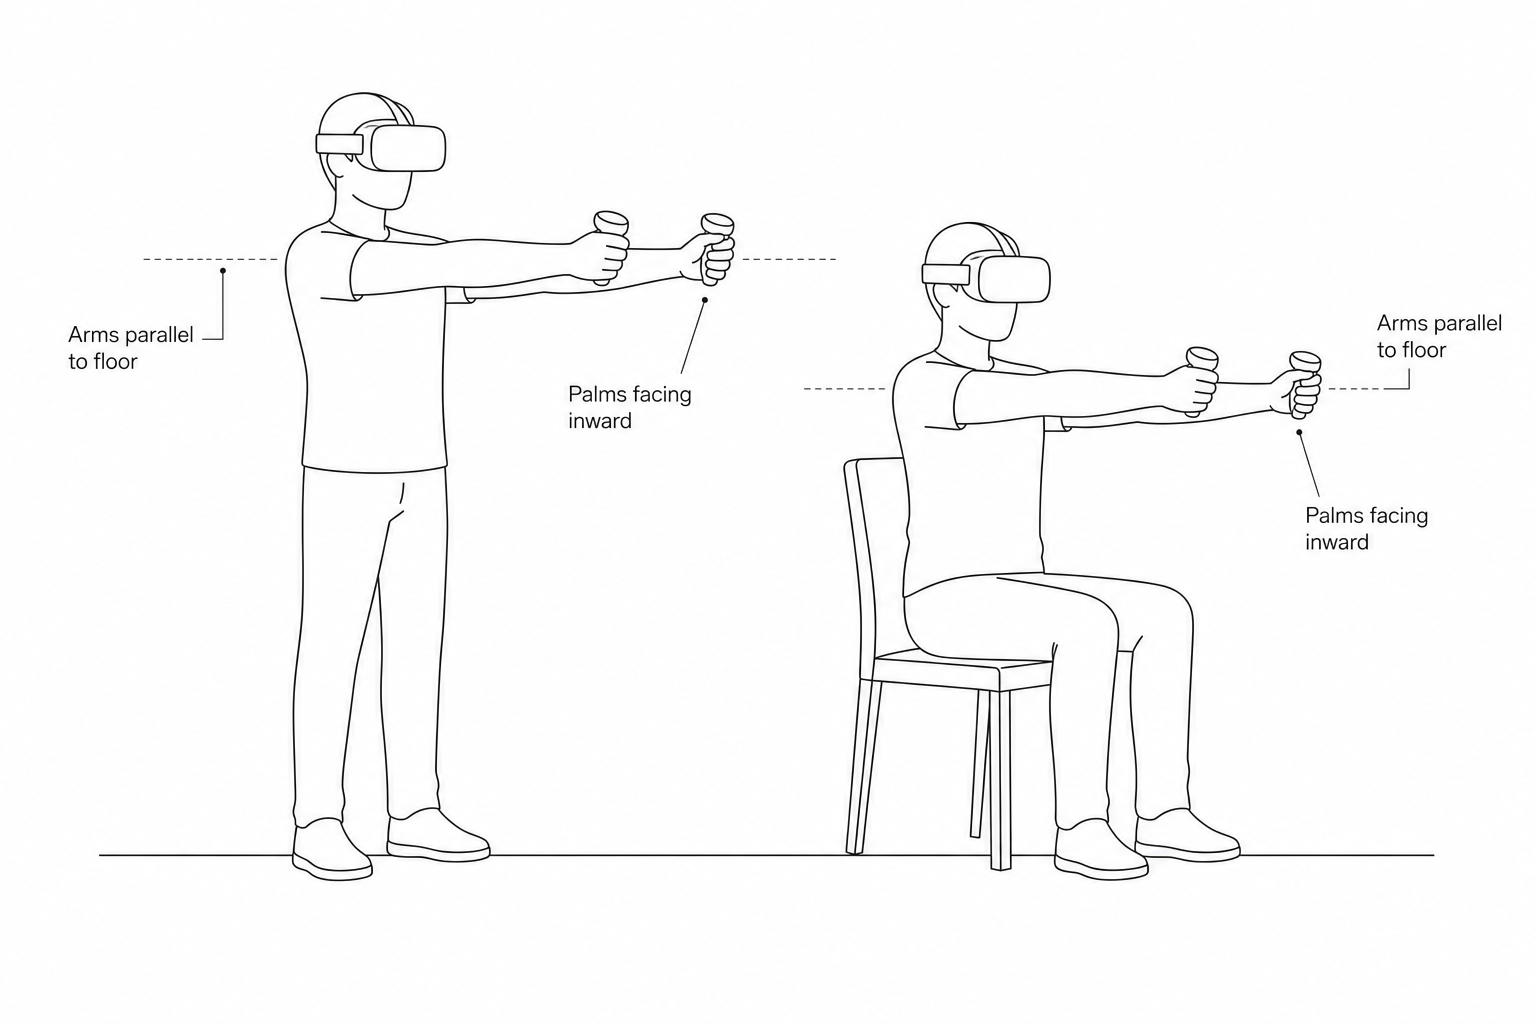
- In Foxglove, the robot model should follow your motion. Recalibrate if the pose looks wrong.
Attention
- After calibration, keep both feet fixed during teleoperation.
- To move, disconnect teleoperation first, move, then recalibrate.
Real robot operation
Warning
- Real robot operation involves risk. Keep a 3‑meter clear area around the robot.
- Connect to the real robot only after the teleoperation program runs normally and the preview looks correct.
- Confirm preview joint positions match the robot pose before enabling control.
- Do not switch to other modes (walking, running demos, etc.) during teleoperation.
- In an emergency:
- LT + B: enter damping mode
- LB + RB: power off actuators
Real robot operation by model
Follow the standard boot process to start the robot.
- Zero position mode (Press A)
- Standing mode (Press X)
- In Standing Mode, press D‑pad Right to connect teleoperation
- In Standing Mode, press D‑pad Left to disconnect teleoperation
Follow the standard boot process to start the robot.
- Zero position mode (Press A)
- Motion mode (Press X)
- In Motion Mode, press D‑pad Right to connect teleoperation
- In Motion Mode, press D‑pad Left to disconnect teleoperation
Hand mapping on the real robot
- Right controller A: calibration
- Right controller B: disconnect teleoperation
- Right controller Home: reset VR position
- Right controller A touch: right thumb rotation
- Left controller X touch: left thumb rotation
- Right Trigger: right thumb/index open/close
- Left Trigger: left thumb/index open/close
- Right Grip: right middle/ring/little finger open/close
- Left Grip: left middle/ring/little finger open/close
Troubleshooting
| Symptom | What to check |
|---|---|
| Body tracking won't start | Return to the PICO Motion Tracker app; confirm all 5 Trackers are connected and calibrated. |
| Cannot send control data | Verify IP and port, and that Connect was tapped. |
| Preview skeleton stutters | Brief signal occlusion; stand still for a few seconds—tracking usually recovers. |
| App crashes | Reopen the app; the system clears background memory automatically. |
| Tracker won't connect | Ensure Bluetooth is on in the headset; restart the Tracker and try again. |
Last updated: 2026-05-29