PND Adam-U Teleop
pnd_teleoperation This framework is used to develop teleoperation for the Adam robot. It currently supports Noitom motion capture and Meta Quest 3S (coming soon) as data input sources.
🤖Demonstration
TODO
🎨Architecture
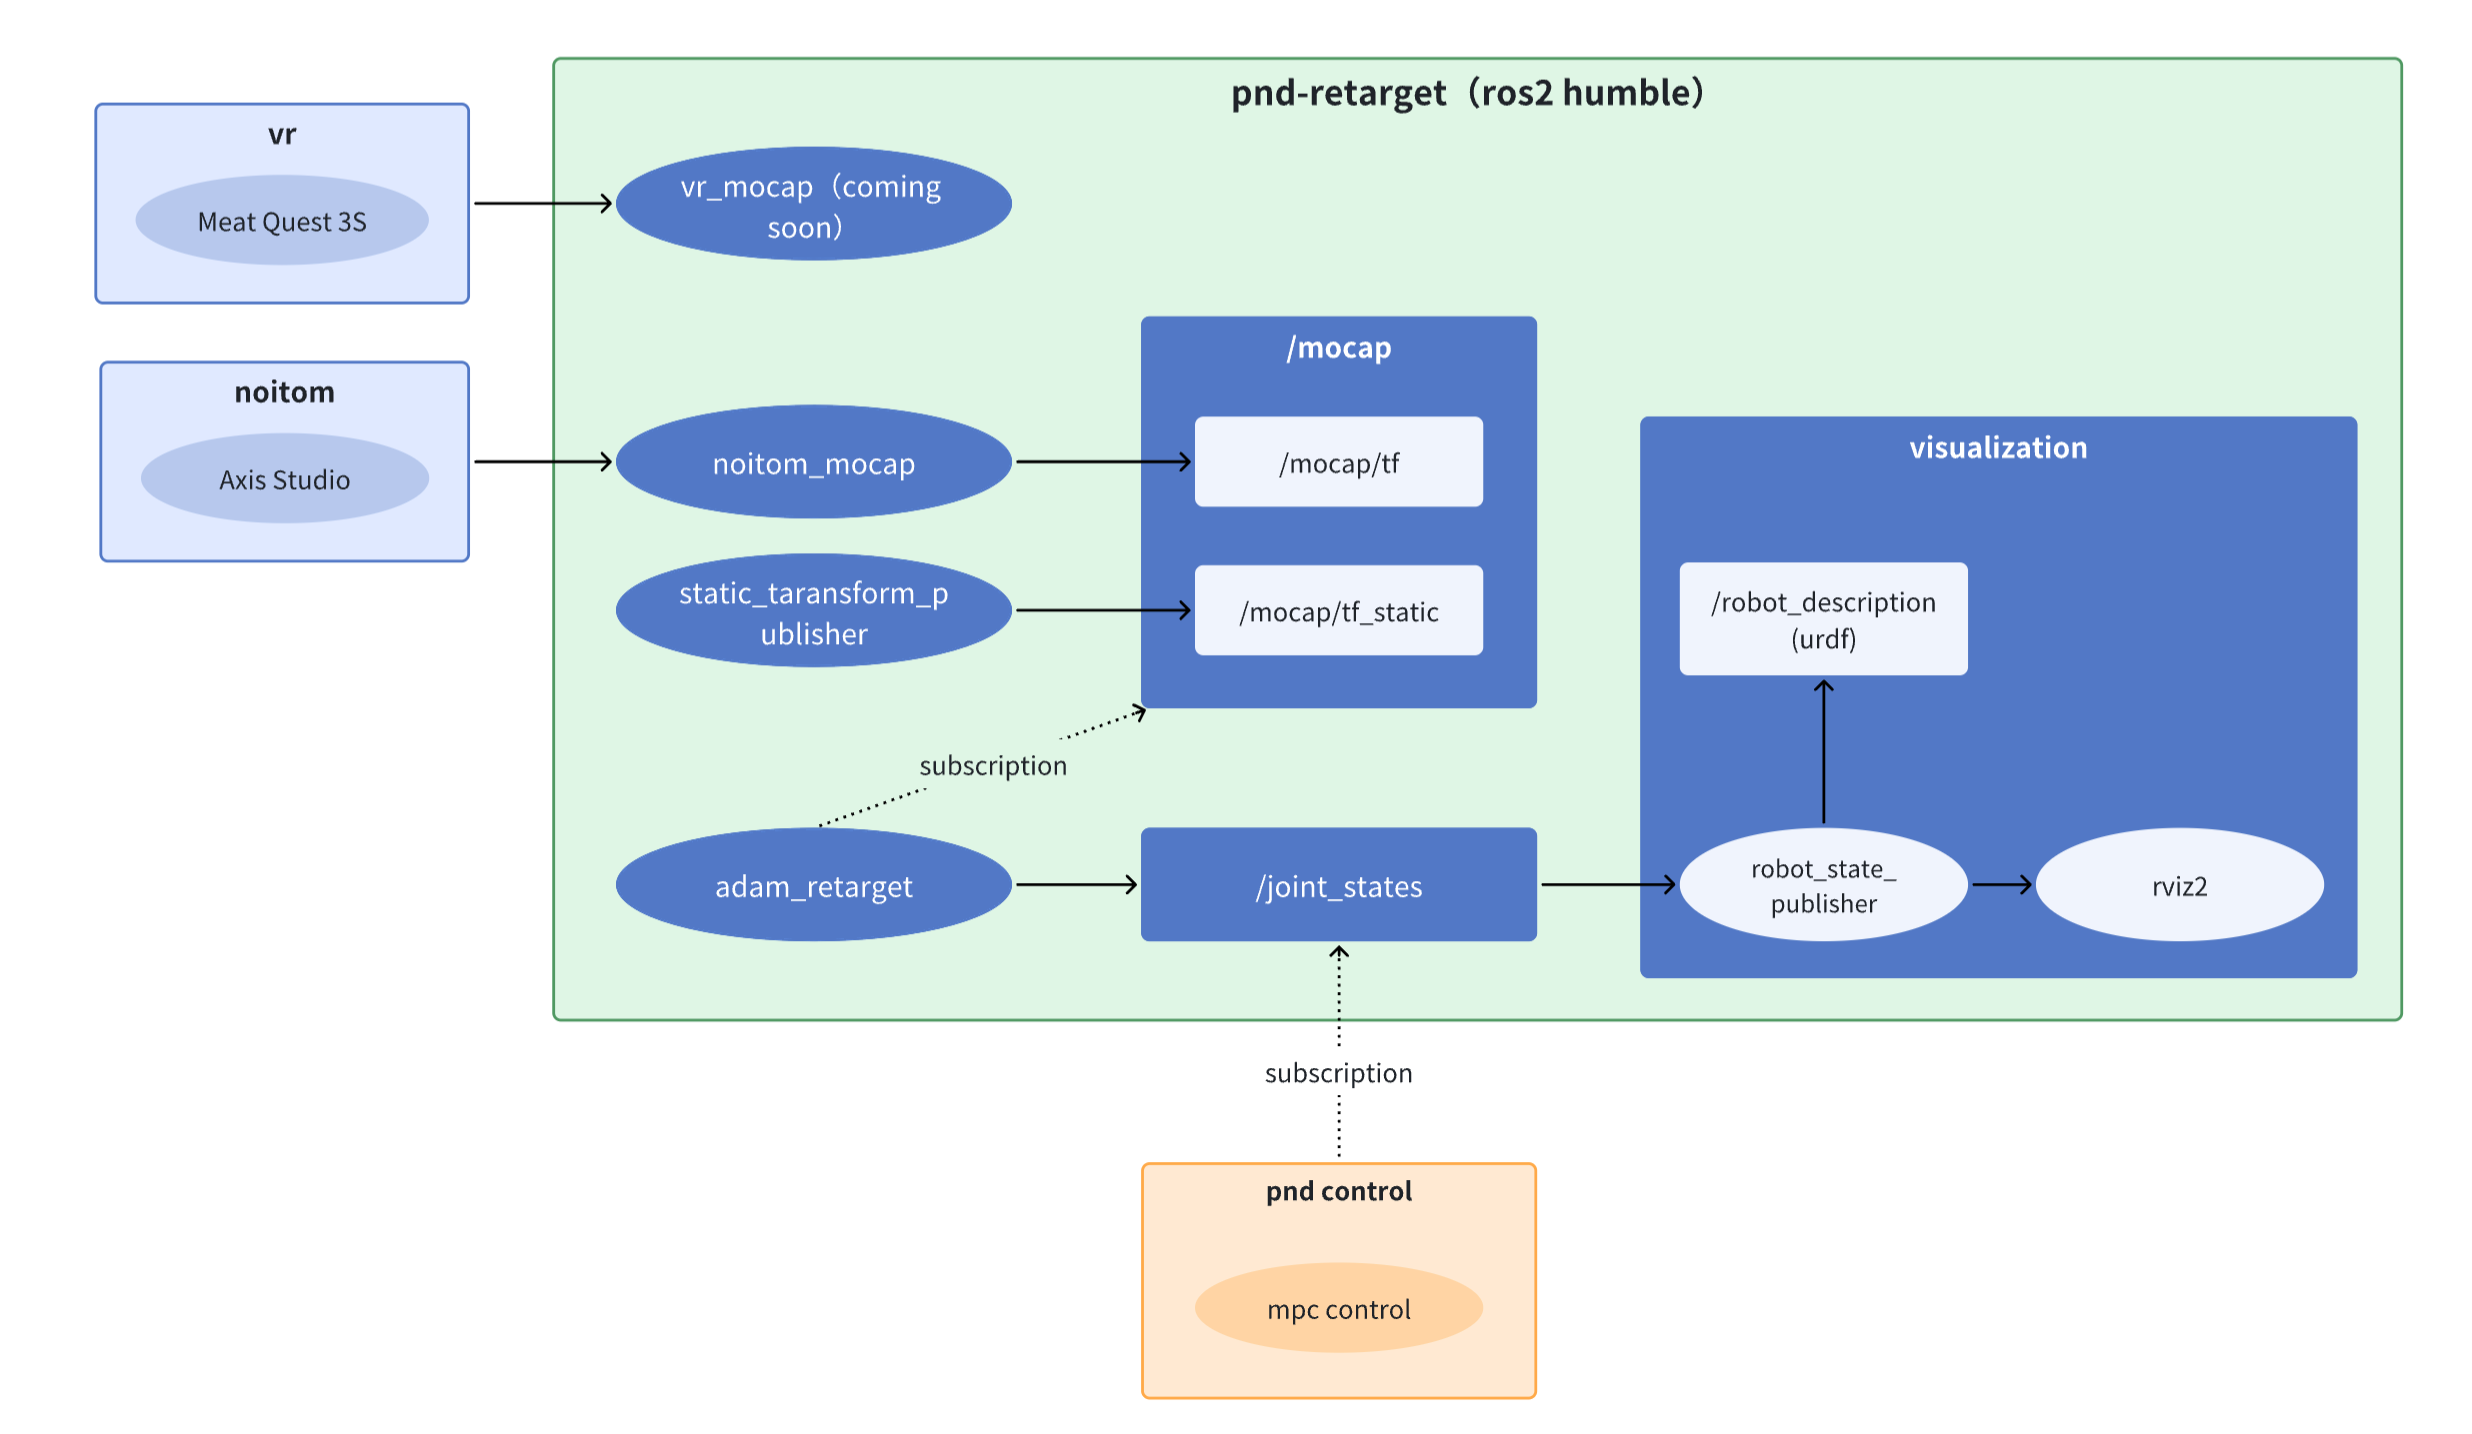
Below is the overall architecture diagram of pnd_teleoperation.
- The Noitom application currently only supports running on Windows computers.
- VR(coming soon)
- pnd_teleoperation and pnd-control run on the built-in NUC in the Adam robot.

🖥️Environment
The built-in computer of the Adam robot comes pre-installed with the environment below. If you need to run pnd_teleoperation on another computer, please configure the environment according to the instructions below.
- Ubuntu 22
- Ros2 humble
- casadi 3.6.7 (3.6.7, install from source, binary is not compatible with ros2 humble)
sudo apt-get update && sudo apt-get install -y \
    build-essential \
    coinor-libipopt-dev \
    gfortran \
    liblapack-dev \
    pkg-config \
    swig \
    git \
    cmake \
    python3 \
    python3-pip \
    --install-recommends
cd /tmp && \
git clone https://github.com/casadi/casadi.git casadi && \
cd casadi && \
git checkout 3.6.7 && \
mkdir build && \
cd build && \
cmake -DWITH_PYTHON=ON -DWITH_IPOPT=ON -DWITH_OPENMP=ON -DWITH_THREAD=ON .. && \
make -j$(nproc) && \
sudo make install && \
sudo ldconfig
💃Motion Capture
Noitom Motion Capture
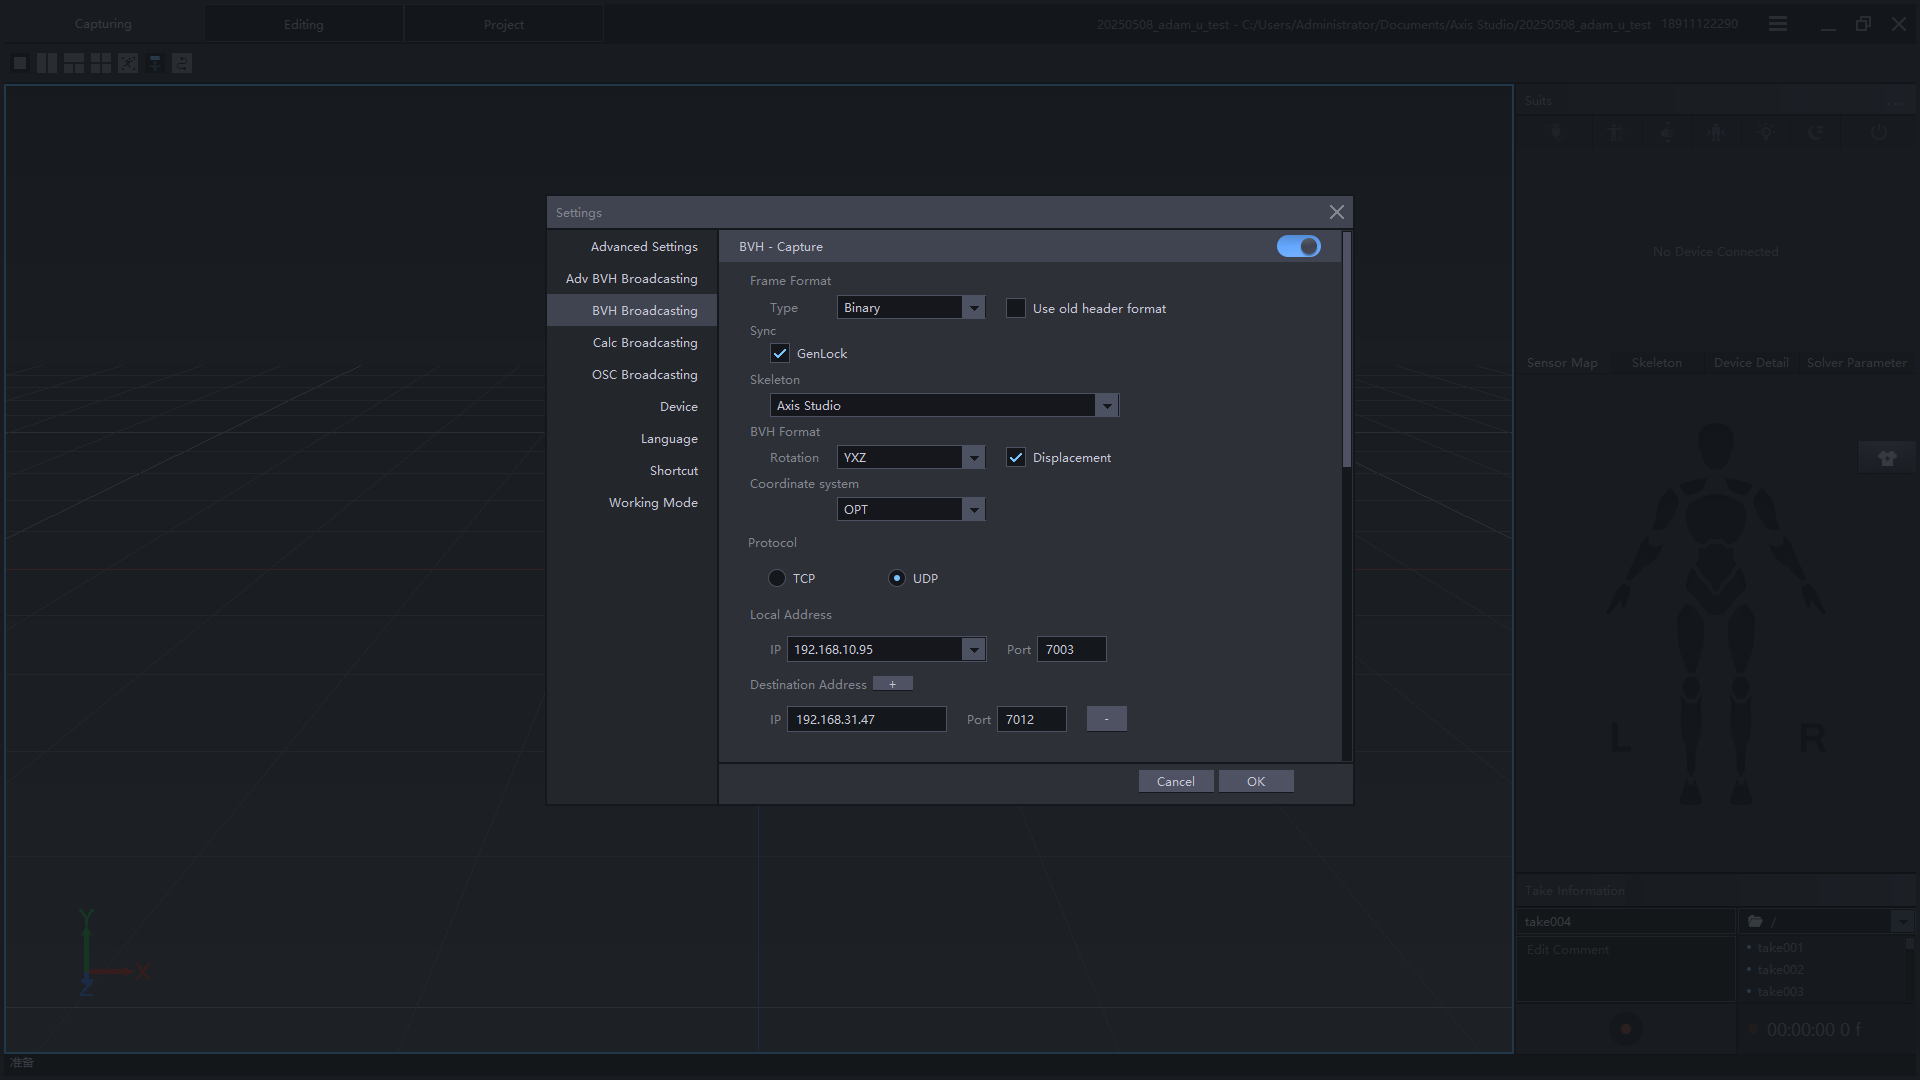
Open Axis Studio, connect the sensors, and calibrate the posture. Use the BVH data broadcast function to send data to the target machine's IP via UDP protocol. For specific instructions on using Noitom, please refer to the Video.
The BVH data broadcast configuration is as follows:
Set the Local Address to the IP address of the computer running the Axis software, and set the Target Address to the IP address of the Adam robot's computer. The two computers must be on the same local network.

VR
coming soon
🎯pnd-retarget
Connect to NUC
Execute the following command in the terminal (the IP address is located on the back of the robot controller):
Password: pndxyzBuild
cd ~/Documents
wget https://github.com/pndbotics/pnd_teleoperation/archive/refs/tags/v0.5.0.tar.gz
tar -zxf v0.5.0.tar.gz
cd pnd_teleoperation-0.5.0
source /opt/ros/humble/setup.bash
colcon build
Run
Preview
Open a new terminal
Start Foxglove Studio on your PC, register, and log in.
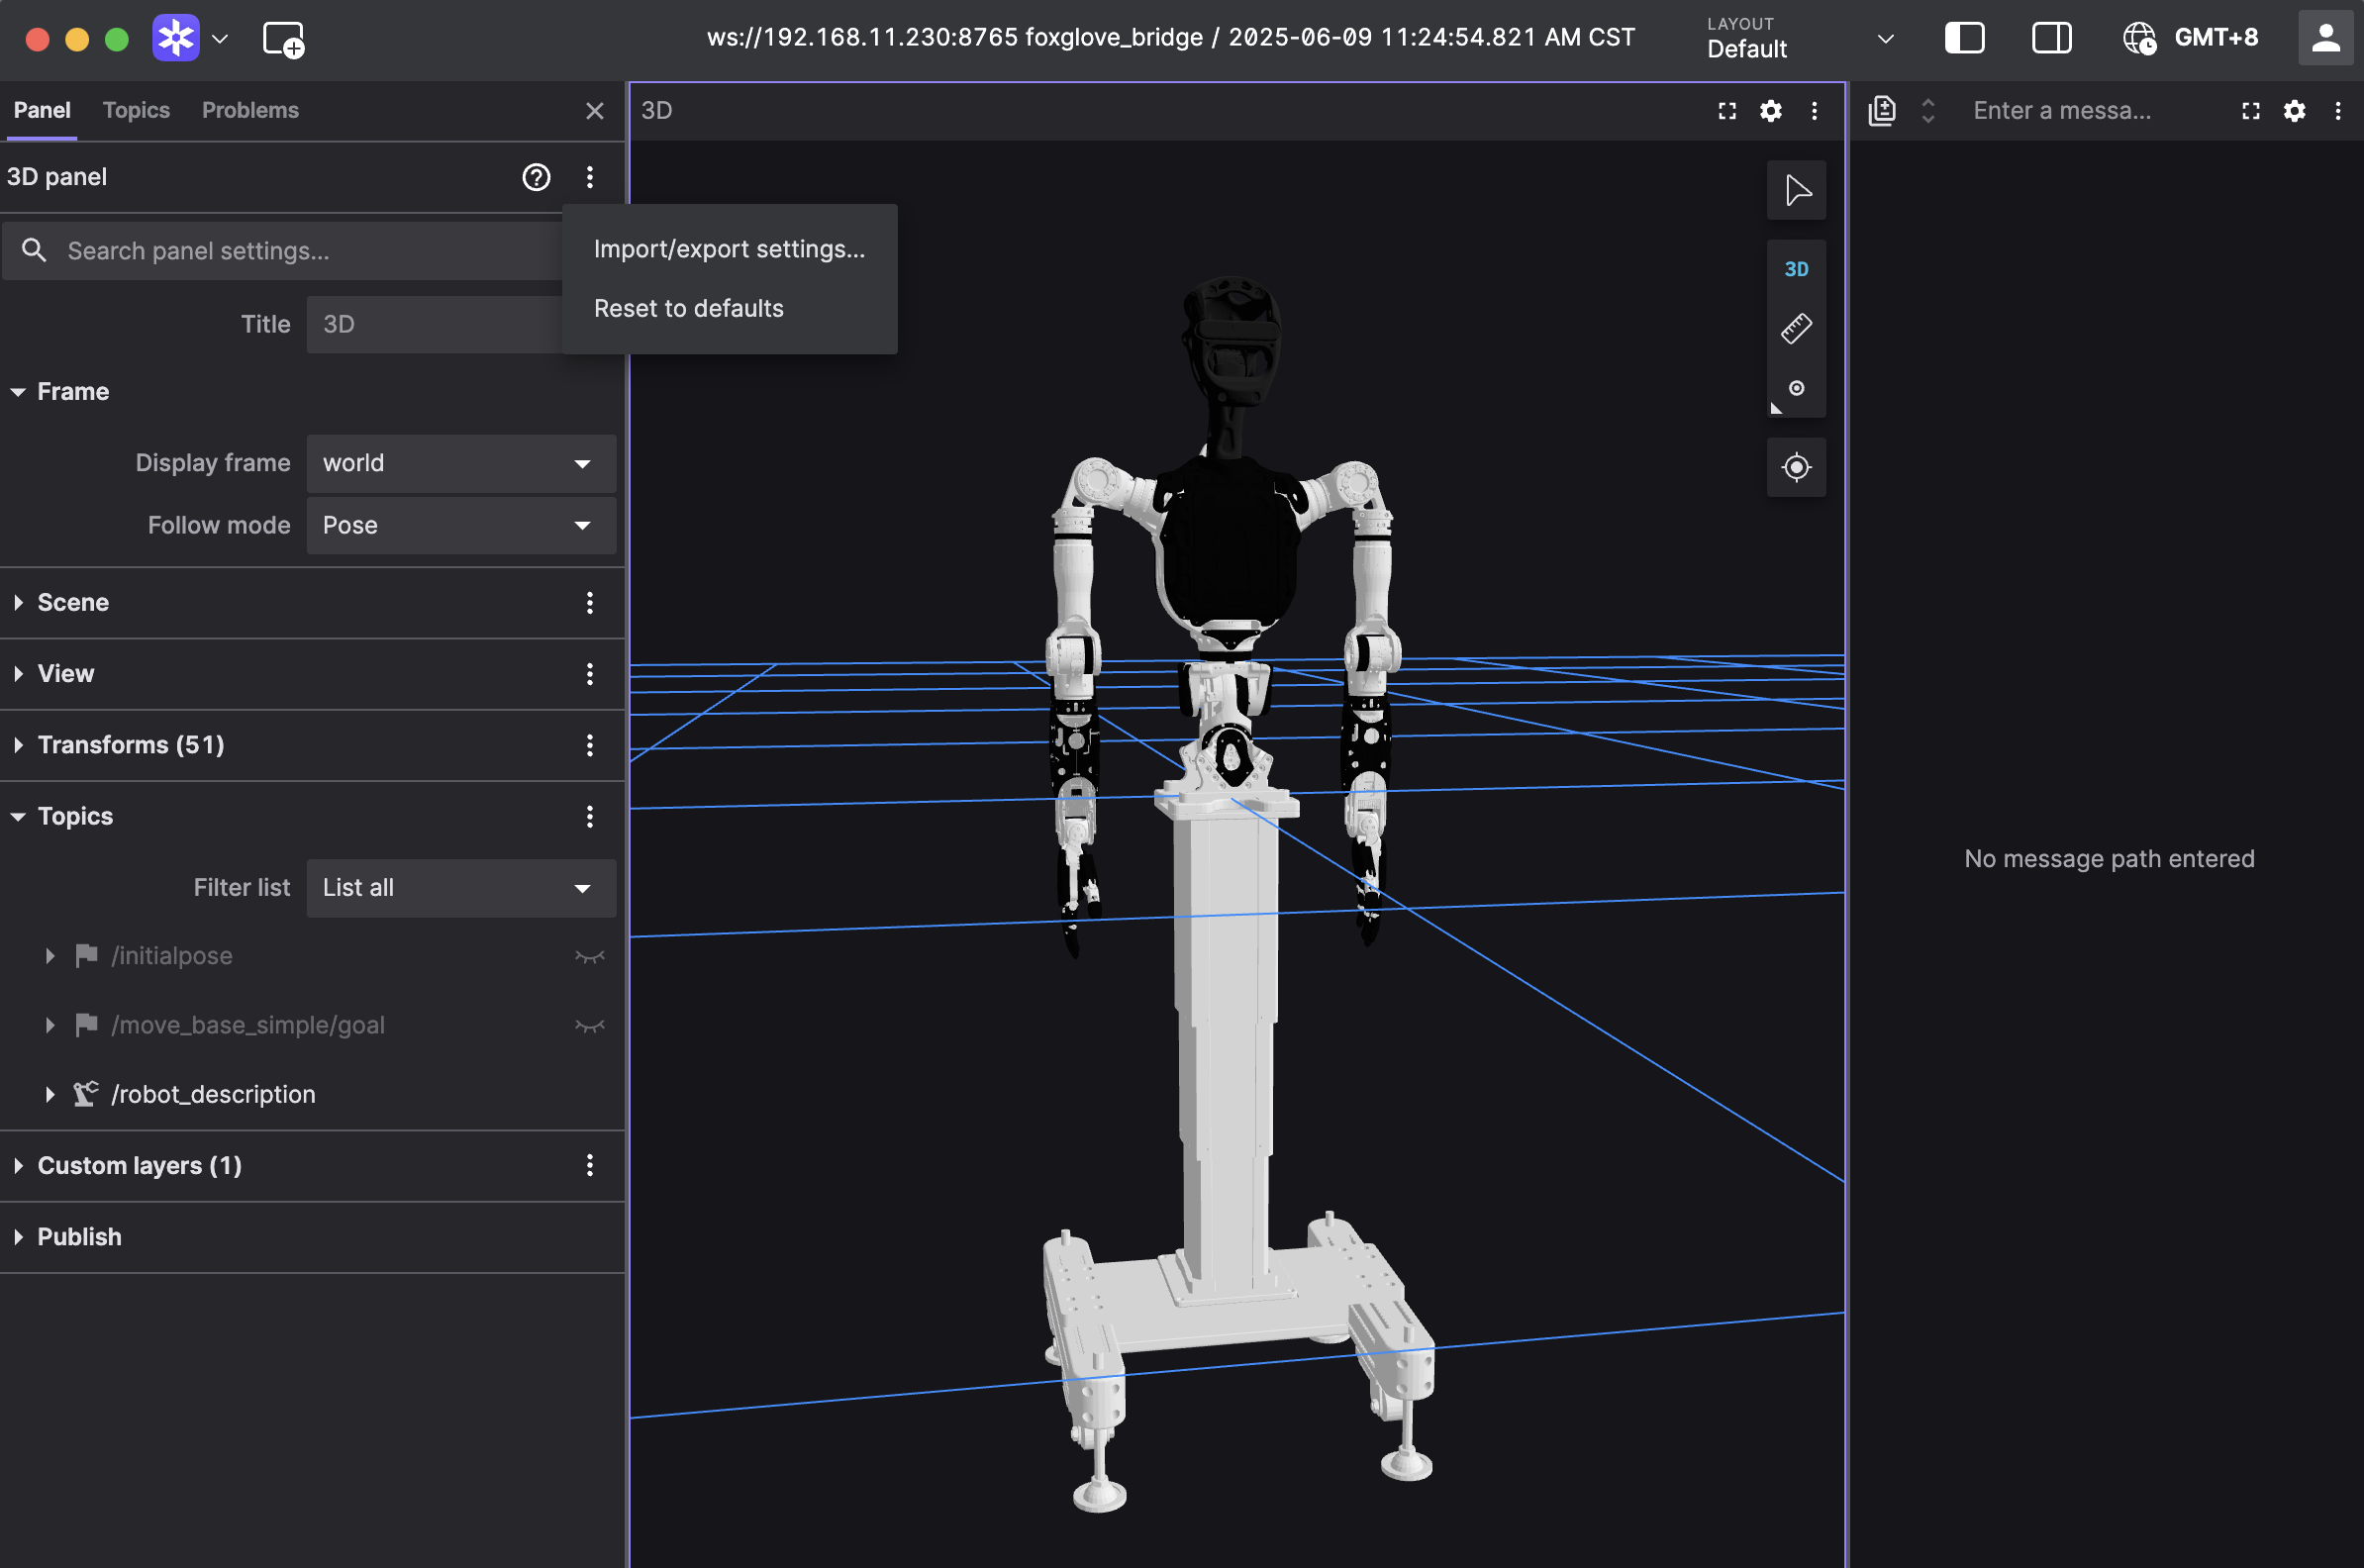
Click open connection. Use Foxglove WebSocket to connect to the robot. In ws://localhost:8765, replace localhost with the corresponding robot IP.
Click on the 3D panel, and the panel configuration will appear on the left. Import the 3D panel configuration: copy the following content into the configuration and click Apply. After successful configuration, you will see the effect as shown in the figure below, where the robot follows the motion capture.

{
  "layers": {
    "845139cb-26bc-40b3-8161-8ab60af4baf5": {
      "visible": true,
      "frameLocked": true,
      "label": "Grid",
      "instanceId": "845139cb-26bc-40b3-8161-8ab60af4baf5",
      "layerId": "foxglove.Grid",
      "size": 10,
      "divisions": 10,
      "lineWidth": 1,
      "color": "#248eff",
      "position": [
        0,
        0,
        0
      ],
      "rotation": [
        0,
        0,
        0
      ],
      "order": 1
    }
  },
  "cameraState": {
    "perspective": true,
    "distance": 8.362406704376102,
    "phi": 78.01200929751727,
    "thetaOffset": -81.68452995867766,
    "targetOffset": [
      -4.304686610834797,
      0.46408895757669916,
      -2.8097074529725844e-16
    ],
    "target": [
      0,
      0,
      0
    ],
    "targetOrientation": [
      0,
      0,
      0,
      1
    ],
    "fovy": 45,
    "near": 0.5,
    "far": 5000
  },
  "followMode": "follow-pose",
  "followTf": "world",
  "scene": {
    "meshUpAxis": "z_up",
    "transforms": {
      "showLabel": false,
      "axisScale": 0
    },
    "ignoreColladaUpAxis": true
  },
  "transforms": {},
  "topics": {
    "/robot_description": {
      "visible": true
    }
  },
  "publish": {
    "type": "point",
    "poseTopic": "/move_base_simple/goal",
    "pointTopic": "/clicked_point",
    "poseEstimateTopic": "/initialpose",
    "poseEstimateXDeviation": 0.5,
    "poseEstimateYDeviation": 0.5,
    "poseEstimateThetaDeviation": 0.26179939
  },
  "imageMode": {}
}
Physical Robot
Special Attention
- Teleoperation with the physical robot carries certain risks. Ensure the area within 3 meters around the robot is clear before connecting.
- The
teleop_bincan only receive teleoperation data when the above pnd_teleoperation is running correctly and the preview effect is normal. -
When connecting data, ensure that the joint positions of
adam_spin the preview are roughly the same as those of the physical robot. -
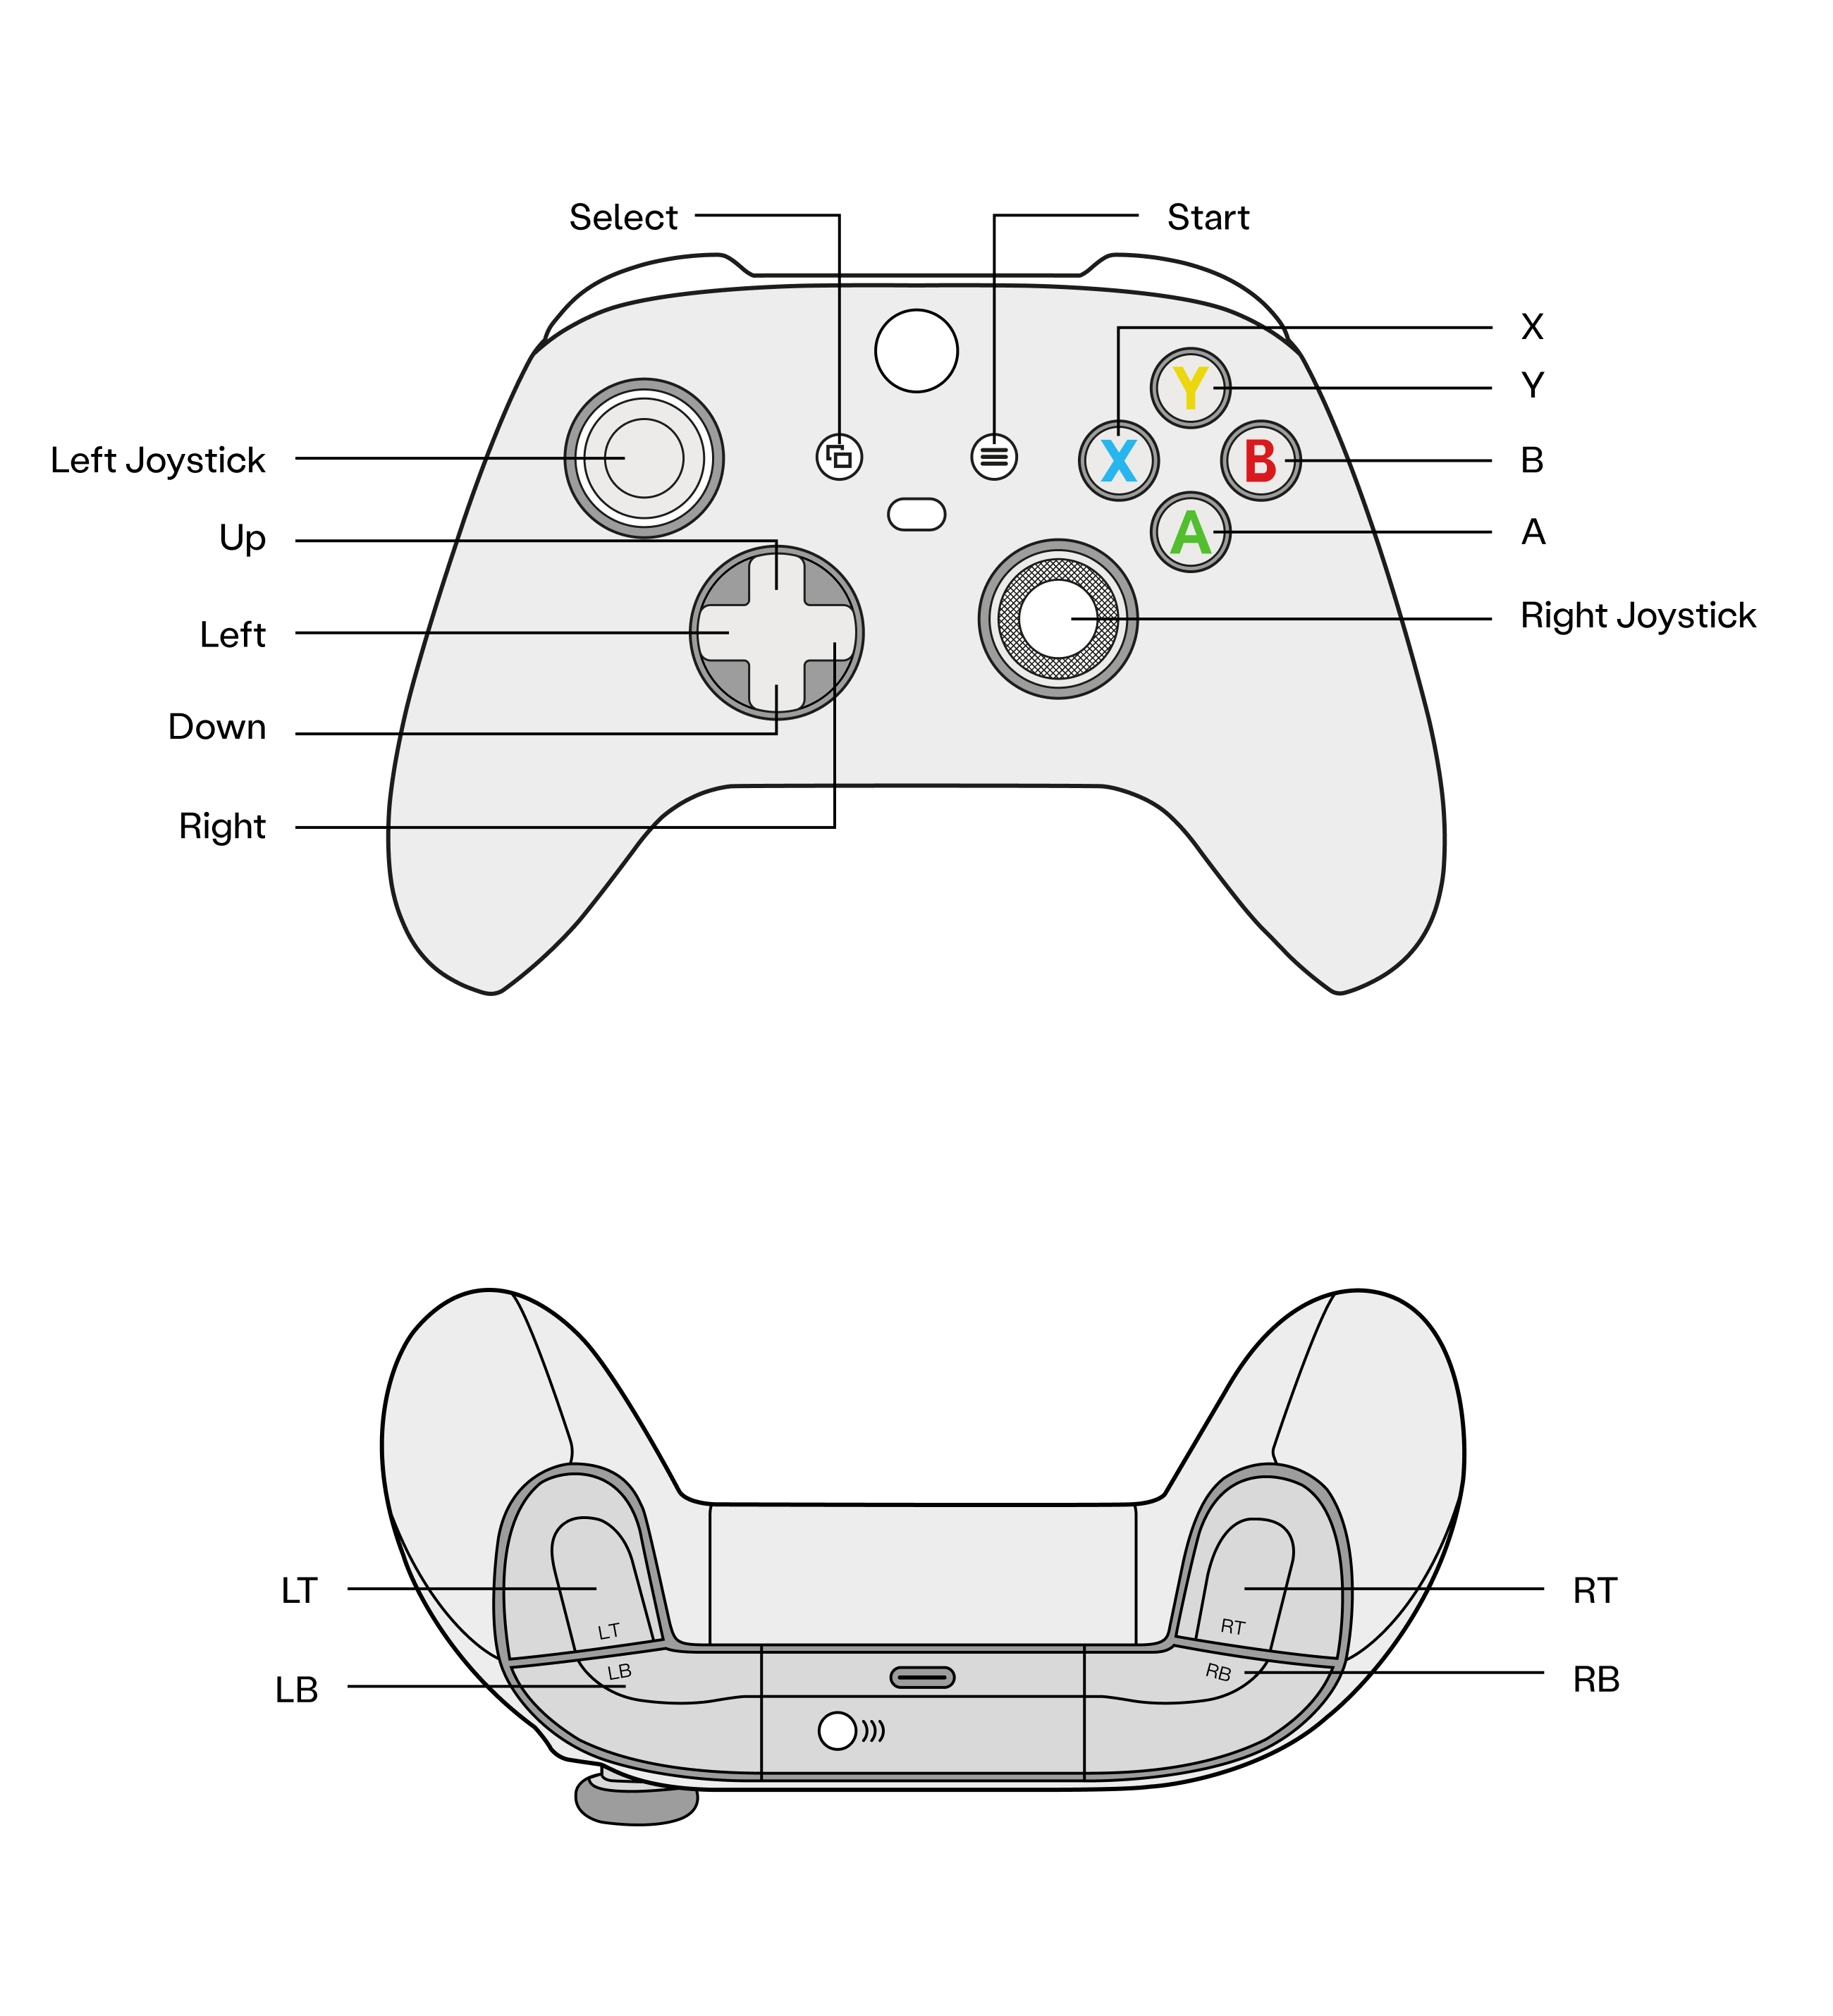
If the robot behaves abnormally, immediately perform the following controller operations:
- LT+B: Enter stop mode.
- LB+RB: Power off the actuators.
▶️ Demo Startup
1.Start pnd_service_dds

✅ When the terminal shows [DDS] Starting publish loop (400 Hz)..., it indicates that the service has started successfully.
2.Start pnd_adam_dds
Open a new terminal

✅ When the terminal shows FSM start!, it indicates that the service has started successfully. After the robot starts, it defaults to the Stop mode.
- Zero return: press A
- Prepare (Function mode): press X
- Press Right to access retarget data in function mode
- Press Left to disconnect retarget data in function mode

VR Display of Adam's Head Camera
Only supports the Adam Zed Mini version
env
- Meta Quest 3/3s, USB3 data cable, Ethernet cable (5m)
- windows system computer
- Meta Quest Link
- SteamVR
- CUDA Toolki
Connection Setup
The Windows computer connects to the Ethernet port on the back of the Adam robot via an Ethernet cable. The Windows computer connects to the Meta Quest 3 via a USB3 data cable.
Jetson Orin Starts ZED Mini Stream
Set the network card connected to the Windows computer and Adam to 10.10.20.110/24
ping 10.10.20.127 # Test network connectivity
# Log in to the NUC to download zed-sdk
ssh pnd-humanoid@10.10.20.127
cd Documents
wget https://gitee.com/clvhao/zed-sdk/repository/archive/dev_pnd.zip

# Log in to Jetson Orin
ssh pnd-humanoid@10.10.20.126
cd Documents
scp pnd-humanoid@10.10.20.127:/home/pnd-humanoid/Documents/dev_pnd.zip .
unzip dev_pnd.zip
cd zed-sdk-dev_pnd/camera\ streaming/sender/python
python streaming_sender.py
Windows Starts Headset Preview
Set up and connect Meta Quest Link and Air Link
# Open a terminal on Windows
curl -o pnd_vr_app.zip https://pndwiki.oss-cn-beijing.aliyuncs.com/sdk_adlskjfas412838_sakjfhrjdsaljf_skfj3jskdjfd32-38439/zed_stream_local20.zip
tar -xf pnd_vr_app.zip
cd zed_stream_local20
& '.\My project.exe' # Or double-click to open My Project.exe
VR FAQ
No calibration file found for SN xxxxxxxx. Downloading...
Log in to https://www.stereolabs.com/developers/calib to download the corresponding calibration file for the ZED Mini SN (xxxxxxxx) and place it in the specified directory on the Orin.