PND Adam-U Teleop
pnd_teleoperation 该框架用来开发adam机器人遥操作。目前支持noitom动捕及meta quest 3S(coming soon)作为数据输入源。
🤖效果展示
TODO
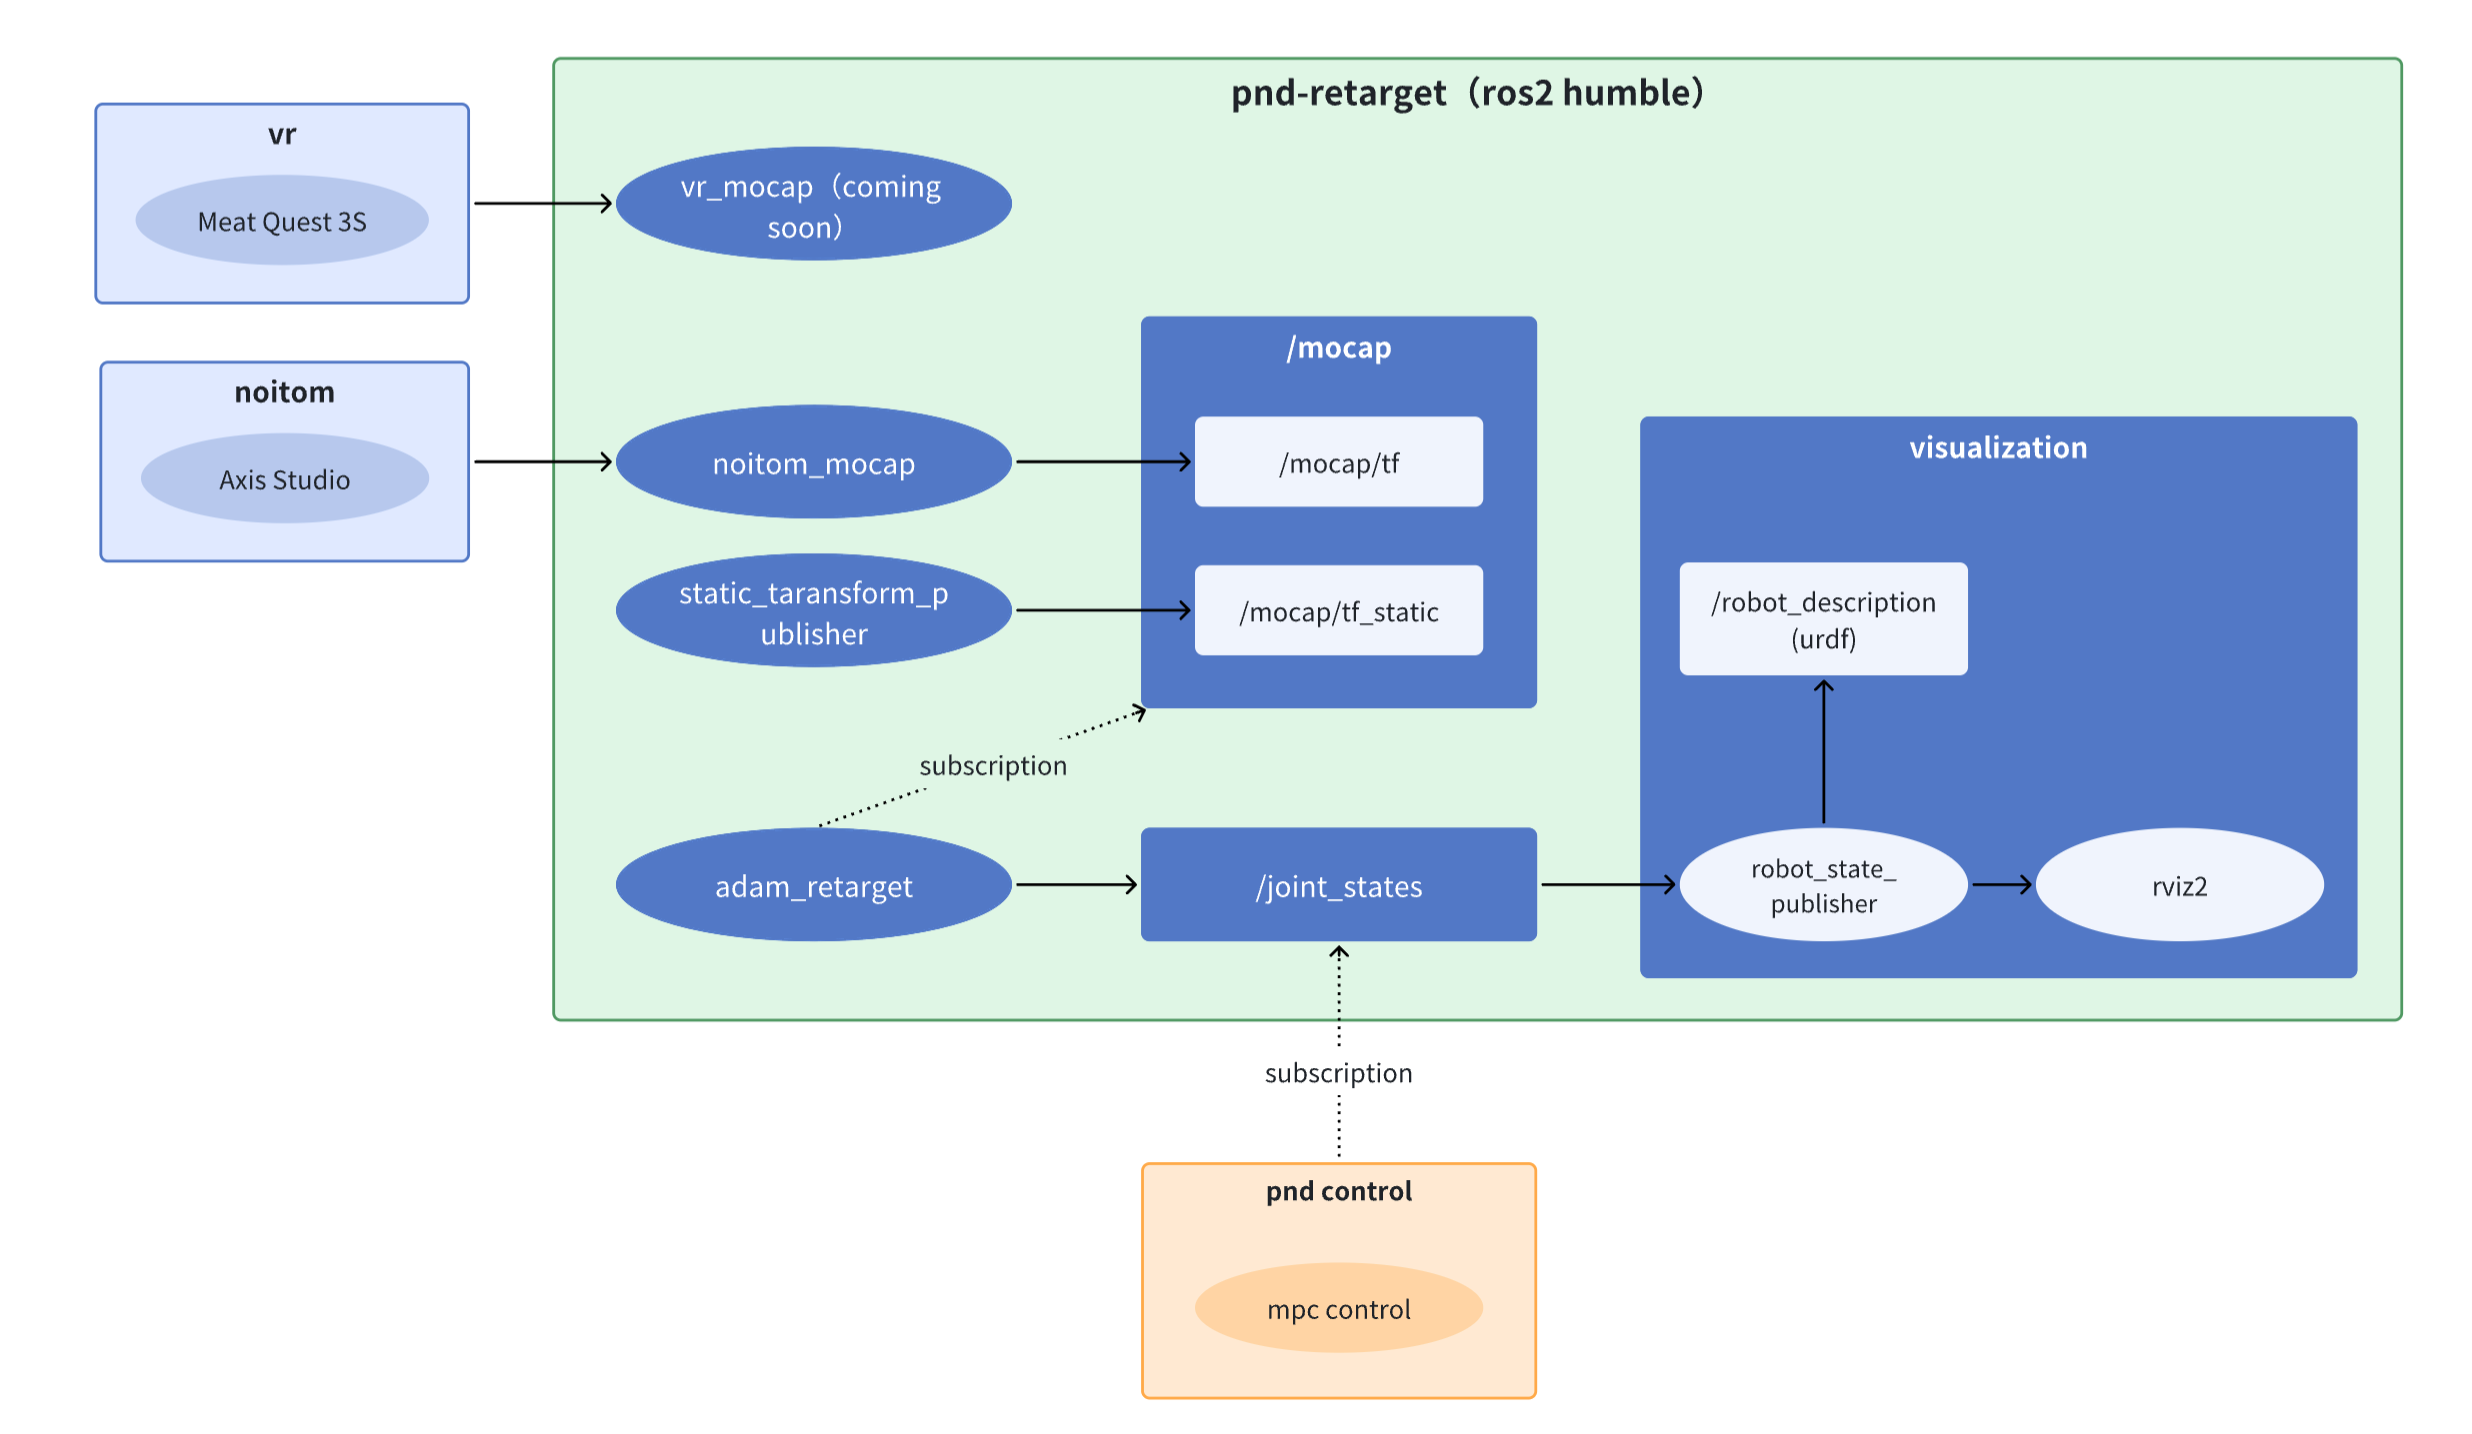
🎨架构
下方是pnd_teleoperation整体架构图。
- noitom application目前仅支持在windows计算机上运行
- VR(coming soon)
- pnd_teleoperation、pnd-control运行在adam机器人内置nuc中
🖥️环境
adam机器人内置计算机已预装下方环境,如需在别的计算机运行pnd_teleoperation请按照下方环境配置。
- Ubuntu 22
- Ros2 humble
- casadi 3.6.7 (3.6.7, install from source, binary is not compatible with ros2 humble)
sudo apt-get update && sudo apt-get install -y \
    build-essential \
    coinor-libipopt-dev \
    gfortran \
    liblapack-dev \
    pkg-config \
    swig \
    git \
    cmake \
    python3 \
    python3-pip \
    git-lfs \
    --install-recommends
cd /tmp && \
git clone https://github.com/casadi/casadi.git casadi && \
cd casadi && \
git checkout 3.6.7 && \
mkdir build && \
cd build && \
cmake -DWITH_PYTHON=ON -DWITH_IPOPT=ON -DWITH_OPENMP=ON -DWITH_THREAD=ON .. && \
make -j$(nproc) && \
sudo make install && \
sudo ldconfig
💃动捕
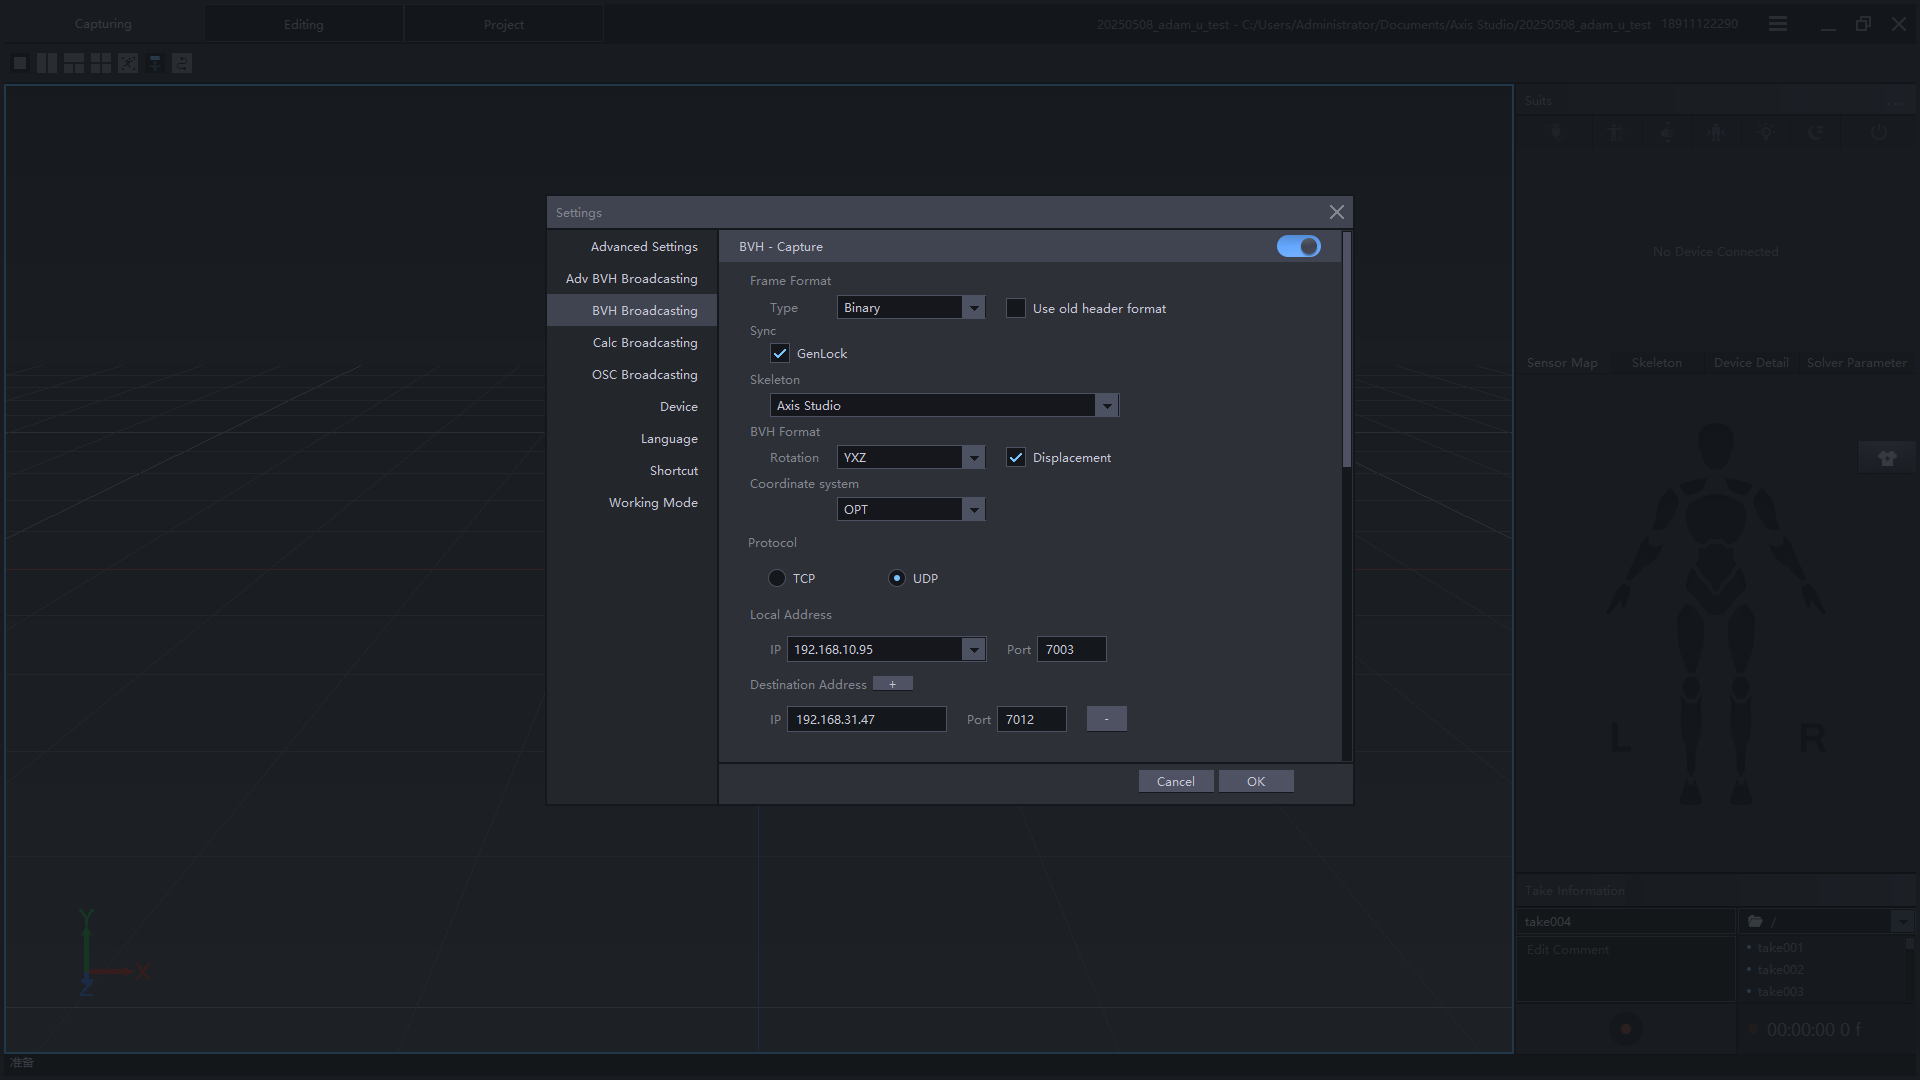
诺亦腾动捕
打开axis studio,连接传感器并校准姿态。使用BVH数据广播功能,以UDP协议发送数据到目标机器ip。 诺亦腾具体使用教程请参考视频。
bvh数据广播配置如下图:
其中本机地址设置为axis软件运行的计算机ip地址,目标地址设置为adam机器人计算机ip地址。两个计算机需处在同一局域网。
VR
coming soon
🎯pnd_teleoperation
连接NUC
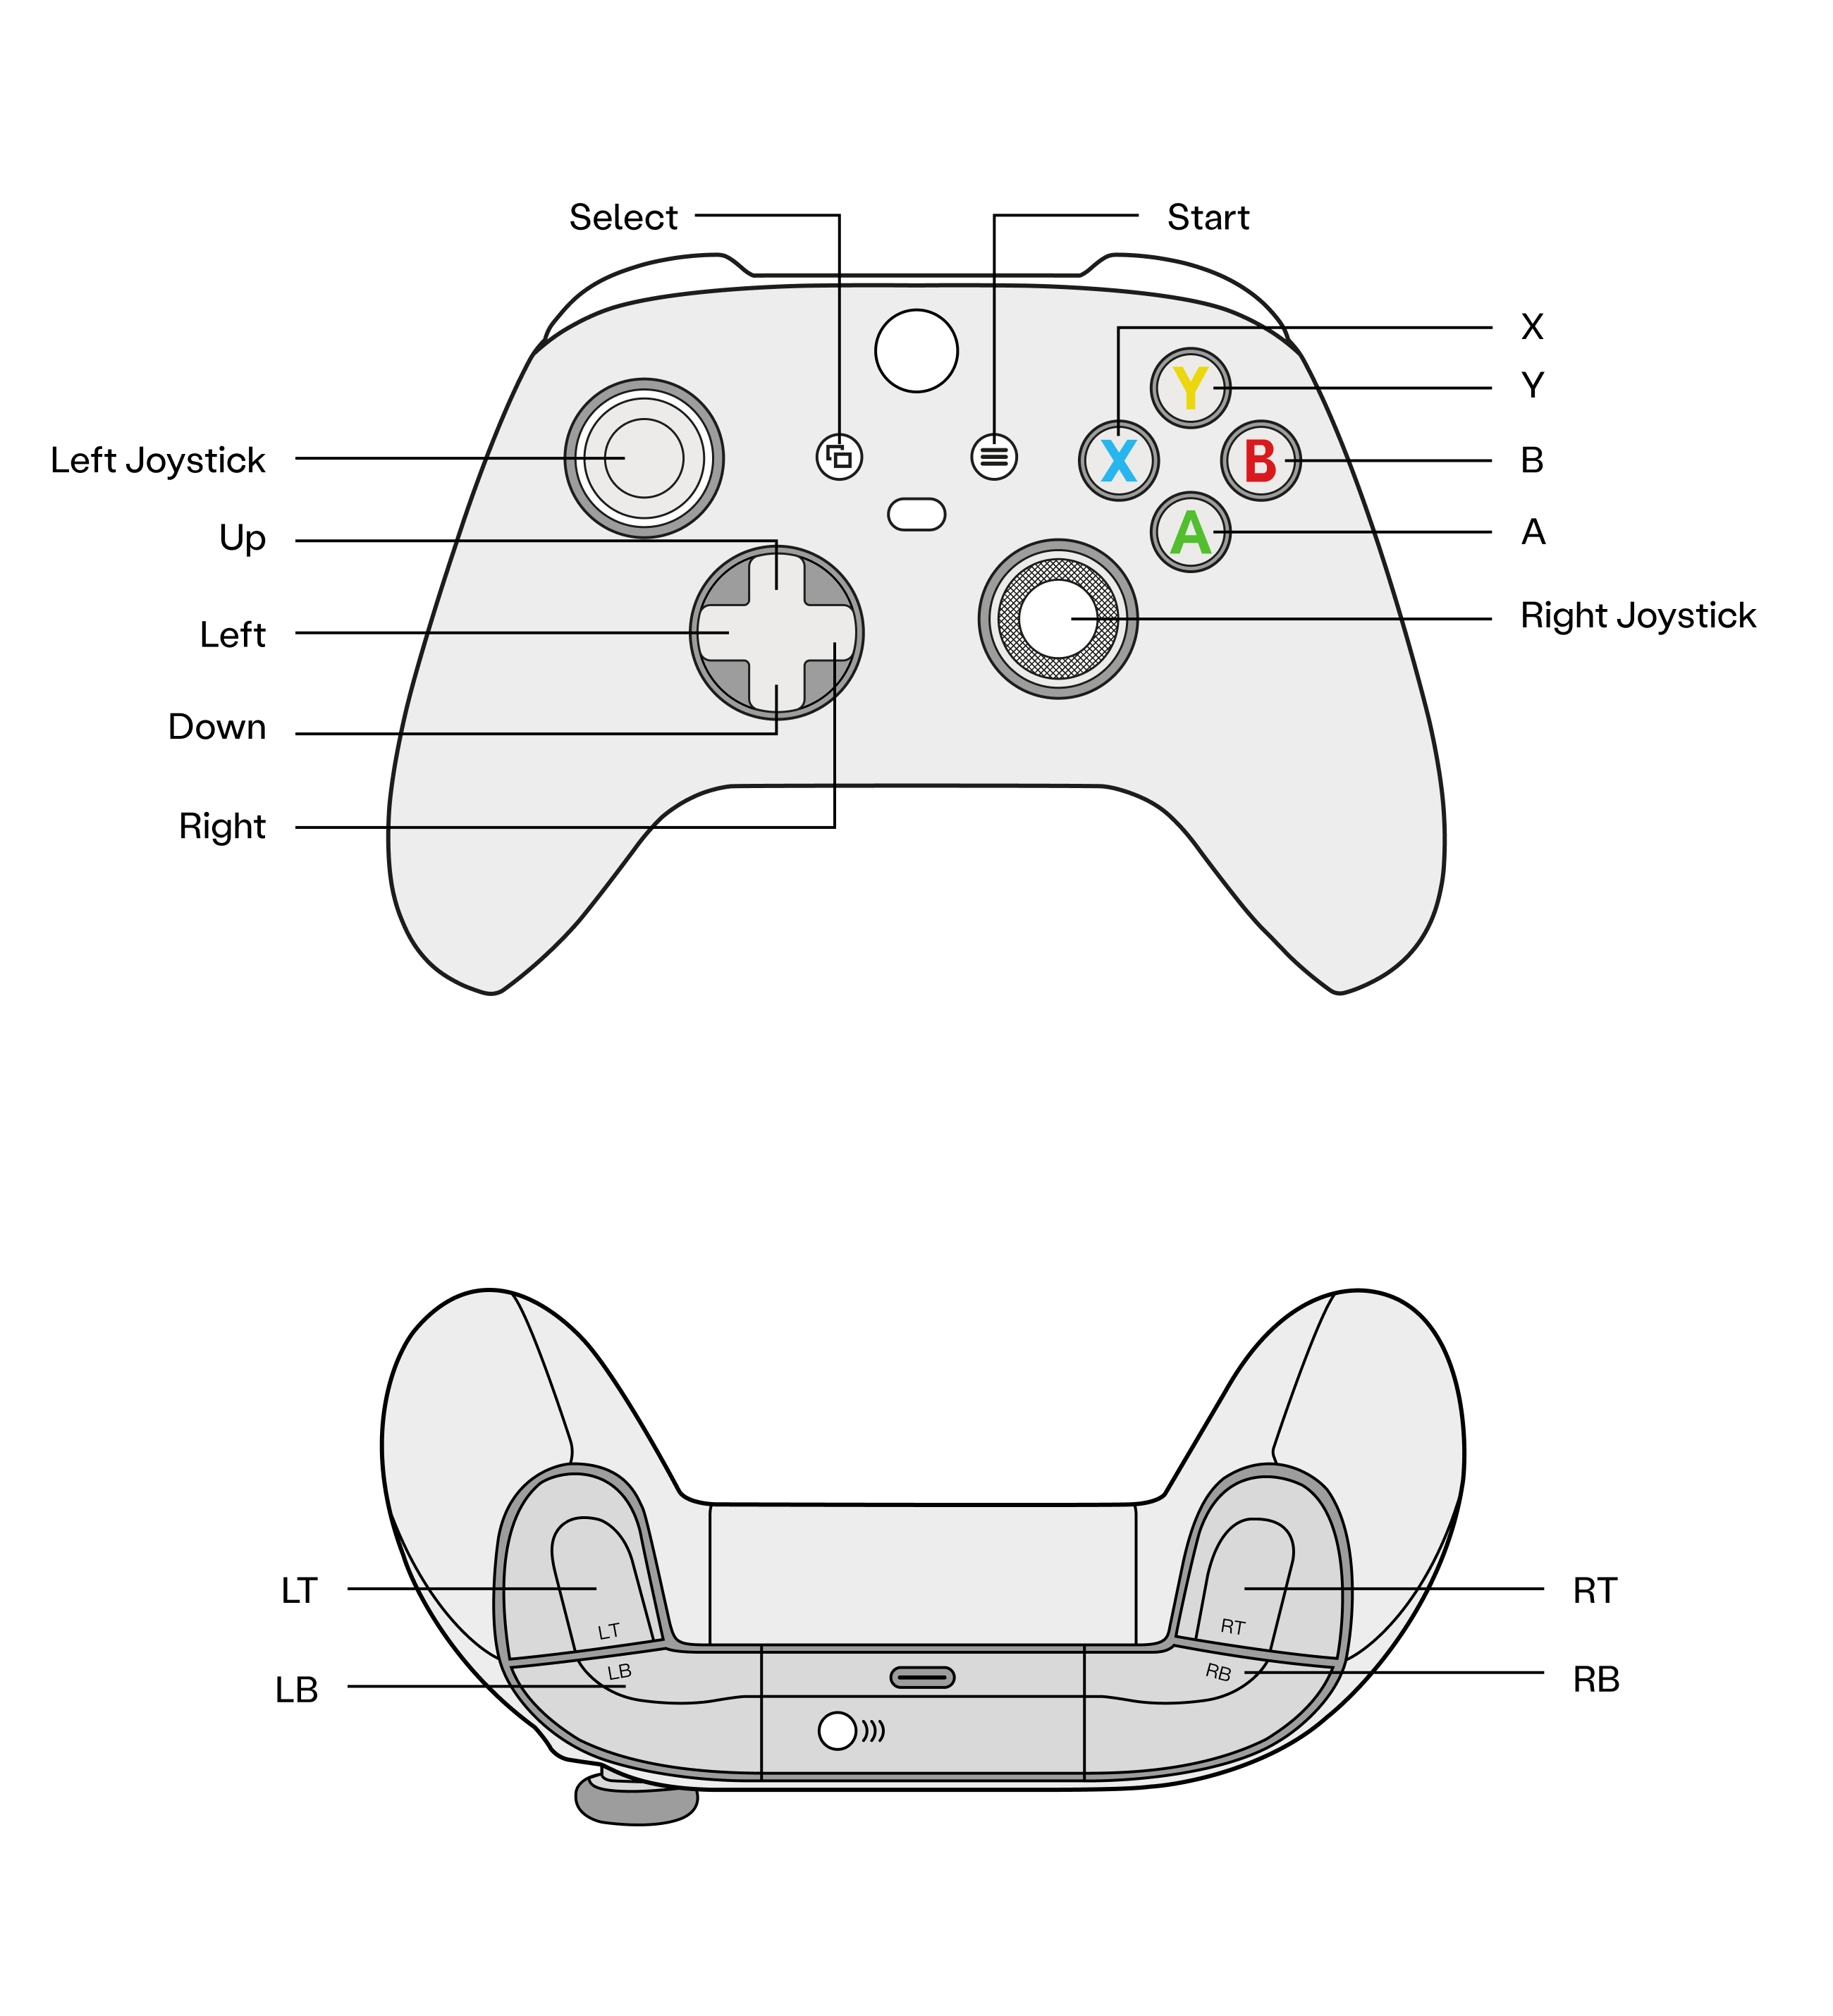
在终端执行命令(IP地址位于机器人手柄背面):
连接密码:pndxyzClone repo
build
Run
预览
打开新的终端
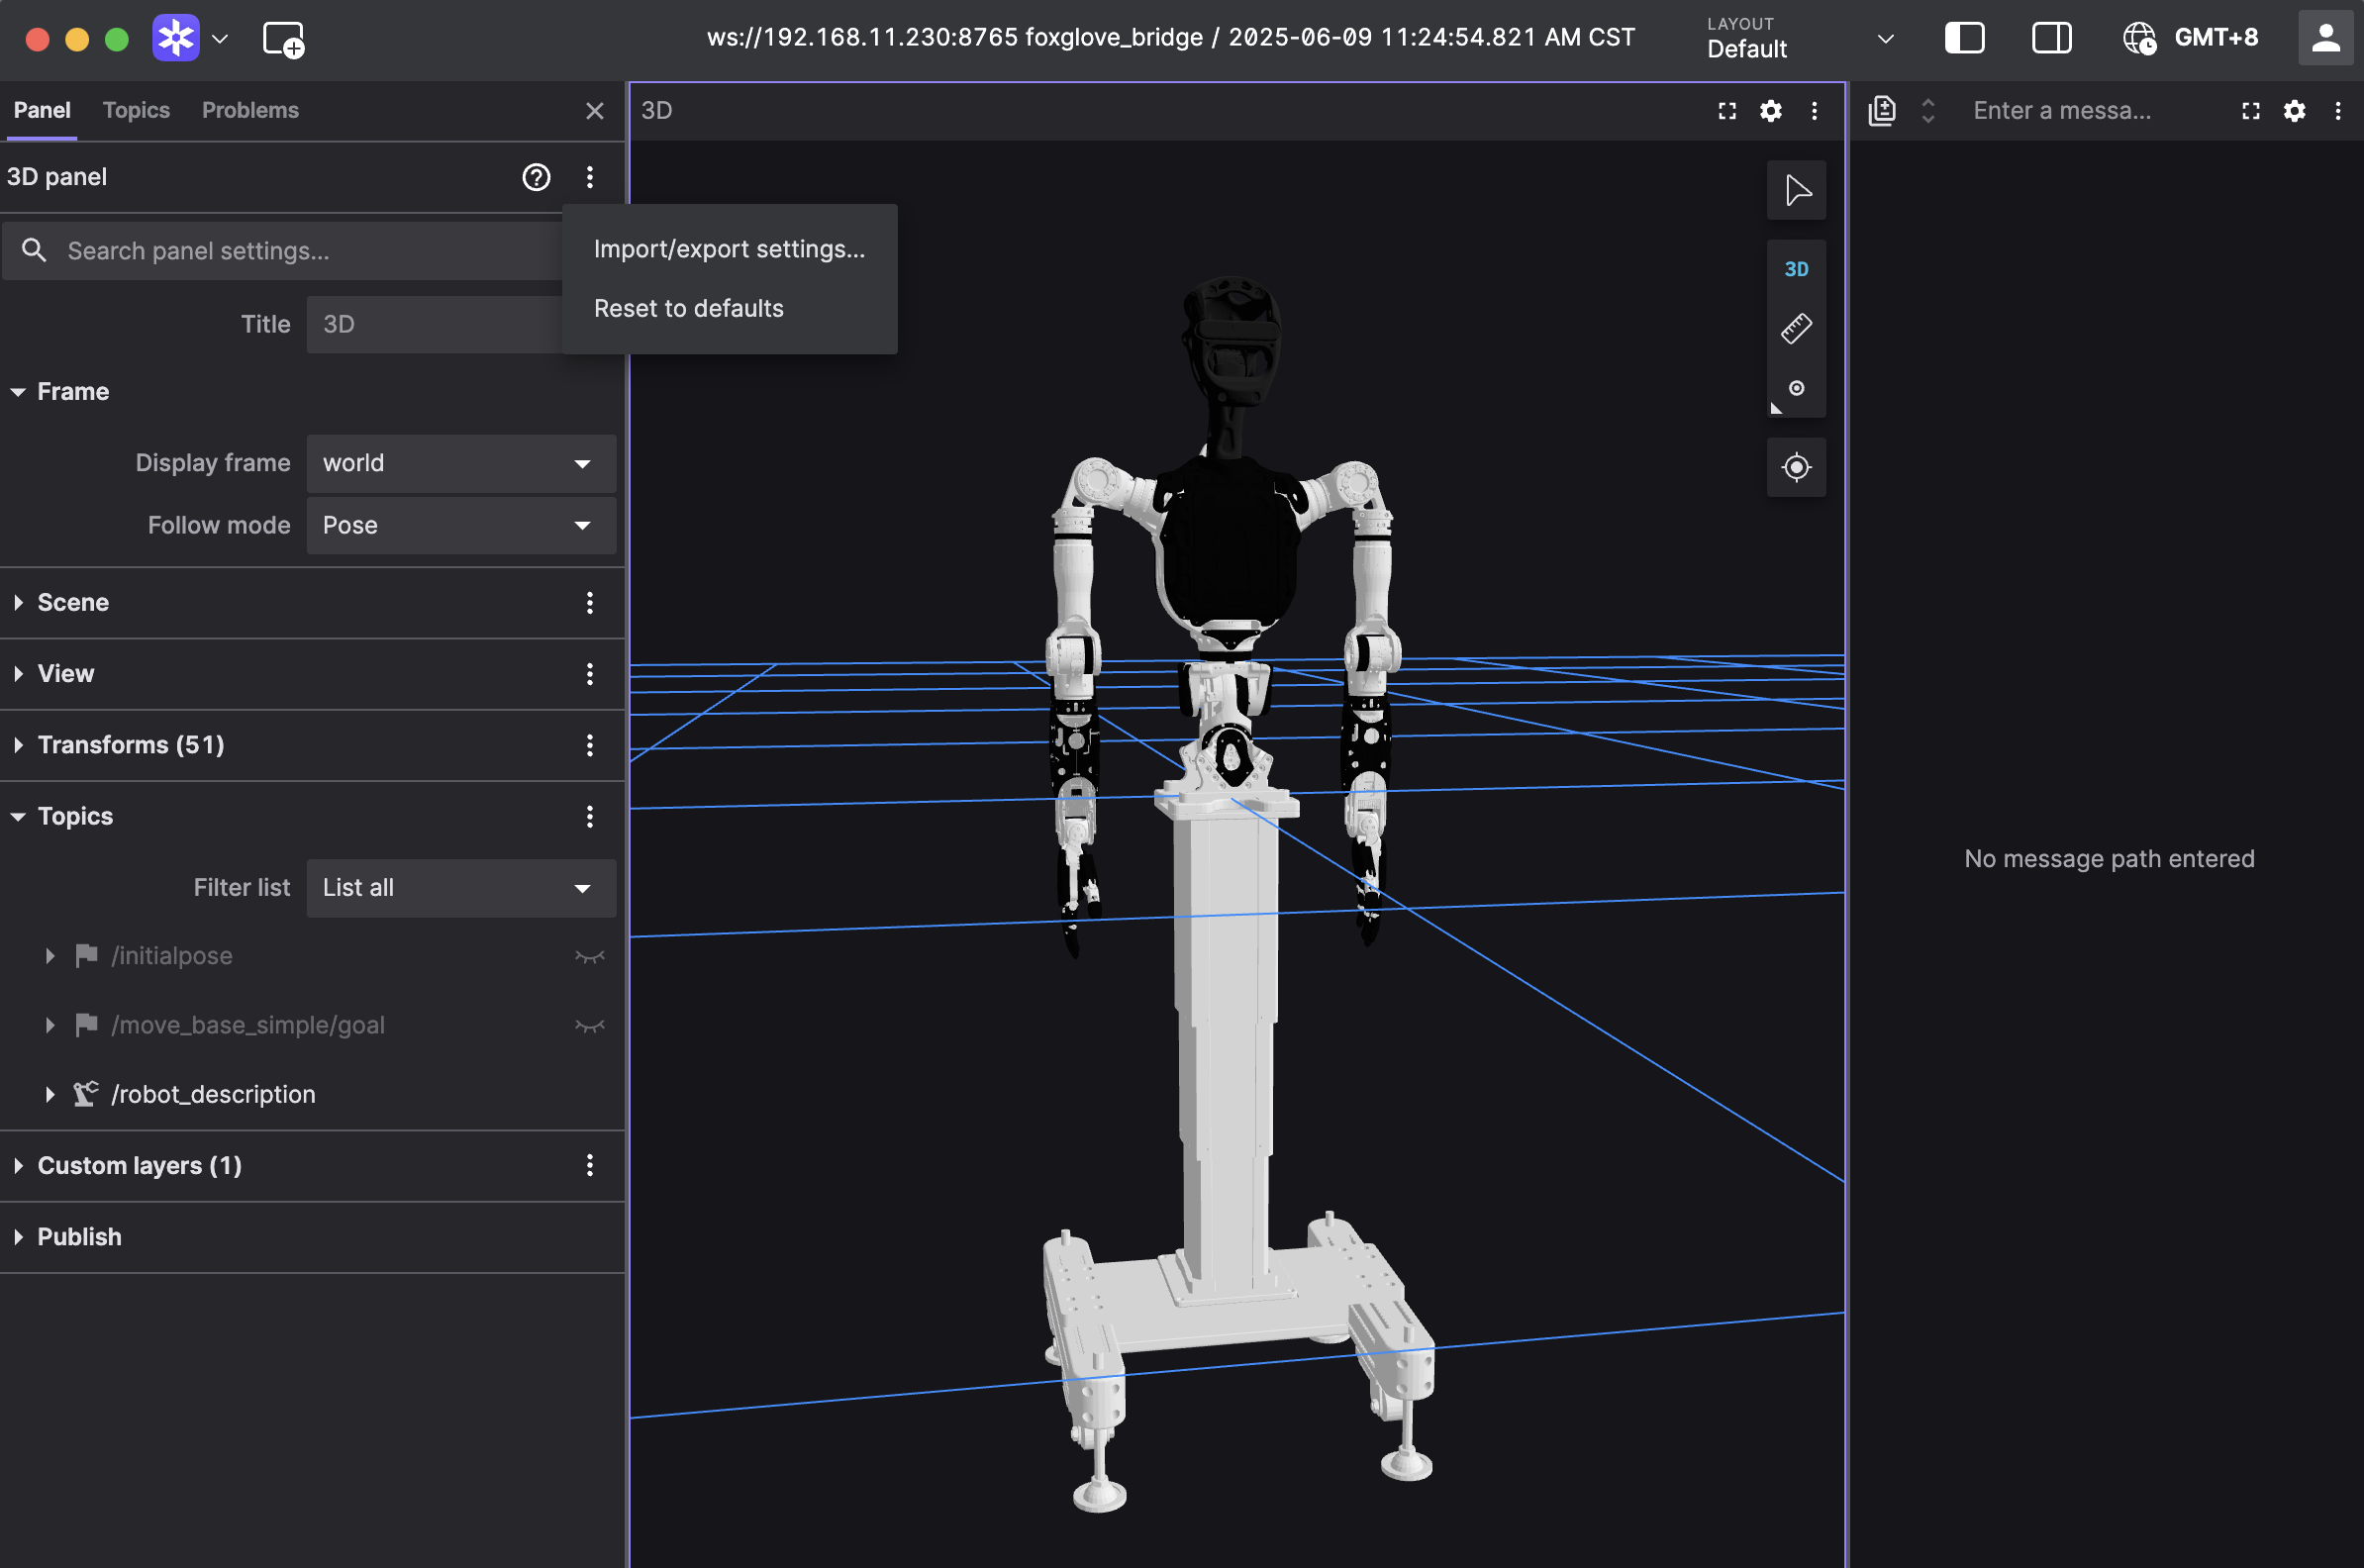
PC启动Foxglove Studio并注册登录
点击open connection
使用Foxglove WebSocket的方式连接到机器人,ws://localhost:8765中localhost需要填写为对应机器人ip
点击三维面板,左侧出现面板配置。导入三维面板配置:将下方内容拷贝到配置中,然后点击Apply。配置成功后可以看到如下图效果,机器人会跟随动捕运动。
{
  "layers": {
    "845139cb-26bc-40b3-8161-8ab60af4baf5": {
      "visible": true,
      "frameLocked": true,
      "label": "Grid",
      "instanceId": "845139cb-26bc-40b3-8161-8ab60af4baf5",
      "layerId": "foxglove.Grid",
      "size": 10,
      "divisions": 10,
      "lineWidth": 1,
      "color": "#248eff",
      "position": [
        0,
        0,
        0
      ],
      "rotation": [
        0,
        0,
        0
      ],
      "order": 1
    }
  },
  "cameraState": {
    "perspective": true,
    "distance": 8.362406704376102,
    "phi": 78.01200929751727,
    "thetaOffset": -81.68452995867766,
    "targetOffset": [
      -4.304686610834797,
      0.46408895757669916,
      -2.8097074529725844e-16
    ],
    "target": [
      0,
      0,
      0
    ],
    "targetOrientation": [
      0,
      0,
      0,
      1
    ],
    "fovy": 45,
    "near": 0.5,
    "far": 5000
  },
  "followMode": "follow-pose",
  "followTf": "world",
  "scene": {
    "meshUpAxis": "z_up",
    "transforms": {
      "showLabel": false,
      "axisScale": 0
    },
    "ignoreColladaUpAxis": true
  },
  "transforms": {},
  "topics": {
    "/robot_description": {
      "visible": true
    }
  },
  "publish": {
    "type": "point",
    "poseTopic": "/move_base_simple/goal",
    "pointTopic": "/clicked_point",
    "poseEstimateTopic": "/initialpose",
    "poseEstimateXDeviation": 0.5,
    "poseEstimateYDeviation": 0.5,
    "poseEstimateThetaDeviation": 0.26179939
  },
  "imageMode": {}
}
实机
特别注意
- 实机遥操作有一定危险,在接入前确保机器人周围3米空旷。
- 当上方pnd_teleoperation正确运行并preview效果正常时,teleop_bin方可接入teleoperation数据。
-
接入数据时确保preview中adam_sp关节位置与实机位置大致相同。
-
当机器人出现异常时请立即进行下列手柄操作
- LT+B:进入停止模式
- LB+RB:执行器断电
▶️Demo 启动
1.启动 pnd_service_dds

✅ 当终端出现
[DDS] Starting publish loop (400 Hz)...时,表示服务已成功启动。
2.启动 pnd_adam_dds
打开新的终端
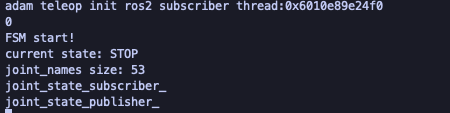
✅ 当终端出现
FSM start!时,表示服务已成功启动。机器人启动后默认进入 Stop 模式。
- 回零(按下 A)
- 准备(按下 X)
- 在准备状态下按下 Right 接入teleoperation数据
- 在准备状态下按下 Left 断开teleoperation数据
VR显示Adam头部摄像头
仅支持Adam Zed Mini版本
env
- Meta Quest 3/3s, USB3数据线, 网线(5m)
- windows系统电脑
- Meta Quest Link
- SteamVR
- CUDA Toolki
连接关系
windows电脑通过网线连接到adam后背的网口 windows电脑通过USB3数据线连接到Meta Quest 3
Jetson Orin启动zed mini流
将windows电脑与adam连接的网卡设置为 10.10.20.110/24
ping 10.10.20.127 # 测试网络是否连通
# 登录到nuc下载zed-sdk
ssh pnd-humanoid@10.10.20.127
cd Documents
wget https://gitee.com/clvhao/zed-sdk/repository/archive/dev_pnd.zip

# 登录到Jetson Orin
ssh pnd-humanoid@10.10.20.126
cd Documents
scp pnd-humanoid@10.10.20.127:/home/pnd-humanoid/Documents/dev_pnd.zip .
unzip dev_pnd.zip
cd zed-sdk-dev_pnd/camera\ streaming/sender/python
python streaming_sender.py
Windows开启头显预览
设置并连接 Meta Quest Link 和 Air Link
# 在windows上开启终端
curl -o pnd_vr_app.zip https://pndwiki.oss-cn-beijing.aliyuncs.com/sdk_adlskjfas412838_sakjfhrjdsaljf_skfj3jskdjfd32-38439/zed_stream_local20.zip
tar -xf pnd_vr_app.zip
cd zed_stream_local20
& '.\My project.exe' # 或双击打开 My Project.exe
VR FAQ
No calibration file found for SN xxxxxxxx. Downloading...
登录到 https://www.stereolabs.com/developers/calib 下载对应的zedmini SN(xxxxxxxx)标定文件放到orin指定目录